


4 – Hardware Installation
Hardware Installation Requirements
4-4 IB0056101-00 G
S
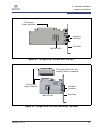
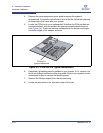
Optical Fibre Option
The QLogic adapter also supports connection to the switch by means of optical
fibres through optical media converters such as the EMCORE™ QT2400. Not all
switches support these types of convertors. For more information on the
EMCORE convertor, see www.emcore.com
.
Intel
®
and Zarlink™ also offer optical cable solutions. See www.intel.com and
www.zarlink.com
for more information.
Configuring the BIOS
To achieve the best performance with QLogic adapters, you need to configure
your BIOS with specific settings. The BIOS settings, which are stored in
non-volatile memory, contain certain parameters characterizing the system. These
parameters may include date and time, configuration settings, and information
about the installed hardware.
There are two issues concerning BIOS settings of which you need to be aware:
Advanced Configuration and Power Interface (ACPI) needs to be enabled.
Memory Type Range Registers (MTRR) mapping needs to be set to
“Discrete”.
MTRR is used by the InfiniPath driver to enable write combining to the on-chip
transmit buffers. This option improves write bandwidth to the QLogic chip by
writing multiple words in a single bus transaction (typically 64 bytes). This option
applies only to x86_64 systems.
However, some BIOS’ do not have the MTRR mapping option. It may have a
different name, depending on the chipset, vendor, BIOS, or other factors. For
example, it is sometimes referred to as 32 bit memory hole, which must be
enabled.
You can check and adjust these BIOS settings using the BIOS Setup utility. For
specific instructions, follow the hardware documentation that came with your
system.
QLogic also provides a script, ipath_mtrr, which sets the MTRR registers.
These registers enable maximum performance from the InfiniPath driver. This
script can be run after the InfiniPath software has been installed. It needs to be
run after each system reboot.
For more details, see “BIOS Settings” on page A-1.