


CHAPTER 2: INSTALLATION 15
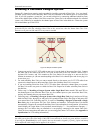
5. Connect a P2CIM-PS2 and its server CPU.
a. Connect the cable strands of an appropriate P2CIM-PS2 to the desired ports on a server CPU:
i. P2CIM-PS2 (IBM PS/2 compatible CPUs): Plug the HD15 strand into the CPU’s HD15 VGA
video port. Plug the purple 6-pin mini-DIN keyboard strand into the CPU’s 6-pin mini-DIN
keyboard port. Plug the light green 6-pin mini-DIN strand into the CPU’s 6-pin mini-DIN
mouse port.
ii. P2CIM-SUN (Sun compatible CPUs): Plug the HD15 strand into the CPU’s HD15 VGA
video port. Plug the 8-pin mini-DIN strand into the CPU’s 8-pin mini-DIN keyboard/mouse
port.
iii. P2CIM-USB (USB CPUs of any platform or P2 CIM-SUSB): Plug the HD15 strand into the
CPU’s HD15 VGA video port. Plug the USB Type A strand into one of the CPU’s USB Type
A ports.
iv. AUATC (serial CPUs, routers, etc.): Please see Appendix E: Using AUATC for RS-232
Access for installation instructions.
v. Z-CIM (local [single-user] IBM PS/2 compatible CPUs): Please see Chapter 5: Paragon II
and Z-CIM for installation instructions.
b. Plug in and power ON the CPU. If the P2CIM-PS2 is installed and operating properly, the
P2CIM-PS2’s green LED will start blinking: once per second while the P2CIM-PS2 is idle, more
quickly while data is passed in either direction.
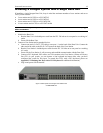
c. Connect one end of a CAT5 UTP cable to RJ-45 port #1 on the back of the Base Unit. Connect the
other end of cable to the RJ-45 port on the P2CIM-PS2.
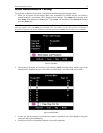
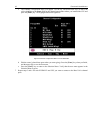
6. Configure the P2CIM-PS2 and the attached CPU.
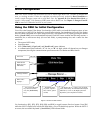
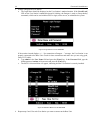
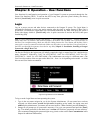
a. The monitor attached to the User Station will display the Selection Menu; with the CPU you just
connected displayed in green. Use the up- and down-arrow keys to move the highlight to that entry
and press the [Enter] key. If you can access and operate the CPU normally, the P2CIM-PS2 is
connected successfully. Raritan recommends you give the server a meaningful system name at this
time, as described in the next steps.
Note: If your video image is fuzzy (especially if you are using an LCD flat-panel monitor), you can adjust
the video gain to focus the video image. If the OSUI is not already displayed, activate it by pressing the
[Scroll Lock] key twice rapidly, then use the numeric keypad’s [+] and [–] (plus and minus) keys to adjust
the video image until it appears to be in focus.
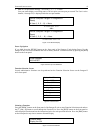
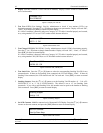
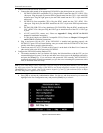
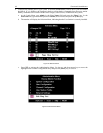
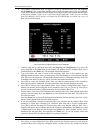
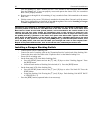
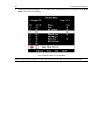
b. Press [F5] to activate the Administration Menu. Use the up- and down-arrow keys to move the
highlight to the Port Configuration entry and press the [Enter] key to select it.
Figure 21 Administration Menu