


CHAPTER 3: OPERATION – USER FUNCTIONS 27
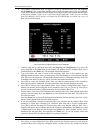
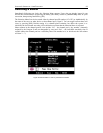
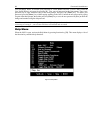
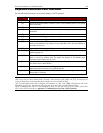
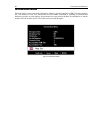
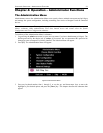
User Profile Parameters and How to Change Settings
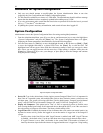
• Scan Mode: Indicates how Paragon II determines the length of time to pause at each channel port
during autoscanning. Default setting is “Global” – the system pauses at each channel port for the same
length of time (length of your choosing). “Individual” setting indicates that the Administrator has set a
specific length of time for individual channel ports (as displayed in the Selection Menu). Use any of
the arrow keys to toggle between these values.
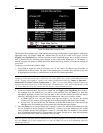
• Global Scan Rate: If Scan Mode is set to “Global,” this parameter determines the length of time that
the system pauses at each channel port while scanning. Using leading zeroes if necessary, type in a
two-digit number of seconds from 01 to 24, or use the up- and down-arrow keys to increment and
decrement the current value by 1 respectively. The default setting is 03.
• ID Display: The ID Display is a small window that can appear on-screen to display the name and ID
of each channel port as you switch between them or scan them. Edit the two fields to determine how
the system will show you this window:
− Possible values in the first field are “On” (ID Display is shown, the default value) and “Off” (ID
Display isn’t shown). Use any of the arrow keys to toggle between these values.
− If the ID Display is set to “On,” the number in the second field indicates how many seconds it will
remain on-screen. Using leading zeroes if necessary, type in a two-digit number of seconds from
01 to 24, or use the up- and down-arrow keys to increment and decrement the current value by 1
respectively. If you type in a number greater than 24, the second field will be filled with a “- -”,
indicating that the ID Display will be shown at all times. The default setting is 03. If the ID
Display is set to “Off,” the number in this field will have no effect.
• Green Mode: A “power-saving mode” that blanks the monitor screen if the user station is idle (no
keyboard or mouse activity) for a specified amount of time. You can edit the two fields to determine
how the system handles this feature:
− Possible values in the first field are “On” (Green Mode is enabled and the screen is blanked after a
period of inactivity) and “Off” (Green Mode is disabled and the screen displays normal video
indefinitely). Use any of the arrow keys to toggle between these values.
− If Green Mode is set to “On,” the number in the second field is how many minutes of inactivity
must elapse before Green Mode is triggered. Using leading zeroes if necessary, type in a two-digit
number of minutes from 01 to 99, or use the up- and down-arrow keys to increment and decrement
the current value by 1 respectively. The default setting is 05. If Green Mode is set to “Off,” the
number in this field will have no effect.
• Hotkey: The keyboard key that, when pressed twice quickly, activates the OSUI. The four alternatives
are [Scroll Lock] (the default), [Caps Lock], the left [Alt] key, and the left [Shift] key. Use any of the
arrow keys to switch between the choices. You cannot select the key currently being used as the
Previous Channel Key (see below).
• Display Position: This position indicates where the OSUI menus and ID Display appear on your
monitor. Move the highlight to “Menu” (for the OSUI) or “ID” (for the ID Display) and press the
[Enter] key to highlight it, then use the left-, right-, up-, and down-arrow keys to move the chosen
window as desired. When finished, press the [Enter] key to save the change.
• Previous Channel Key: The keyboard key that, when pressed twice quickly, causes Paragon II to
return to the previously selected channel port (provided that that channel port is still available) without
going through the OSUI. The four alternatives are the left [Alt] key, the left [Shift] key, [Caps Lock],
[Num Lock] (the default), and “None” (no Previous Channel Key; function disabled). Use any of the
arrow keys to switch between the choices. You cannot select the key currently being used as the
Hotkey (see above).
• Help: This parameter determines the format of the help message at the bottom of each OSUI menu. It
is always set to “Single Line” and cannot be selected or altered.
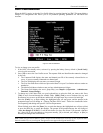
• Local PC: Use any of the arrow keys to toggle Local PC Mode On or Off (the default) for the attached
User Station. Turn PC Mode “On” only if you have used a Z-CIM
to attach a local PC between the
User Station and the Base Unit.