


2. Click [LDAP Settings].
3. Under "LDAP Authentication", select [Active] for [Authentication] to enable LDAP
authentication.
If necessary, also configure [Auto Logout Time (seconds)].
4. Enter the administrator password if required.
5. Click [Apply].
6. Click [Program/Change/Delete LDAP Server].
7. Select [Active] for [LDAP Search] to enable LDAP address search.
If necessary, also configure [LDAP Search Timeout].
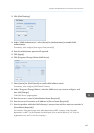
8. Under "Program/Change/Delete", select the LDAP server you want to configure, and
then click [Change].
"Edit LDAP Server" page appears.
9. Enter the server’s name in [Identification Name (Required)].
10. Enter the server's host name or IP address in [Server Name (Required)].
11. Enter the position within the LDAP directory's structure from which to start user searches in
[Search Base (Required)].
For example, if the search target is the sales department of ABC company, enter "dc=sales
department, o=ABC". (In this example, the description is for an active directory. "dc" is for the
organization unit, and "o" is for the company.)
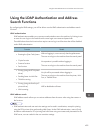
Using the LDAP Authentication and Address Search Functions
441