


104
Chapter 6: Menus and Keys
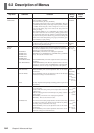
6-2 Description of Menus
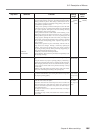
Setting
range
ENABLE/
DISABLE
HIGH/
MIDDLE/
LOW
-30 to +10
(In steps of
1/2)
—
[FEED
SETTING]
[SCAN
SETTING]
-5.0 to
+5.0 mm
(In steps of
0.1 mm)
—
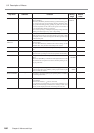
[PRINTING
ADJ.]
-2.0% to
+2.0%
(In steps of
0.05%)
[CUTTING
ADJ.]
-2.0% to
+2.0%
(In steps of
0.01%)
Default
value
ENABLE
MIDDLE
0
—
0 mm
0 mm
—
0%
0%
Function
This specifies whether detection of the front and rear edges of the
media is enabled or disabled.
This should normally be set to [ENABLE].
When loading transparent media, set this to [DISABLE]. When set
to [DISABLE], then during media setup only the [ROLL] selection
is available. When doing this, ensure a margin of 75 mm (3 in.) or
more from the leading edge of the media to the start position for
printing or cutting.
When [EDGE SENSE] is set to [DISABLE], the machine cannot
detect when media runs out. In such cases, printing operation does
not stop when the media runs out, and there is a chance that the platen
may become soiled by ink or that ink may get inside and damage the
machine. If the media while printing is in progress, immediately press
the [PAUSE] key to quit printing.
This sets the height of the print heads.
To make the setting, display this menu, then move the lever on the
side of the unit's print-head carriage.
This adjusts for slippage when performing bidirectional printing.
This must be readjusted when you have replaced the media with a
different type or adjusted the head height.
[TEST PRINT]: This menu is for verifying the adjustment.
[SETTING NO.1], [SETTING NO.2], [SETTING NO.3], [SETTING
NO.4] : This sets the correction value.
[LOAD PRESETTING] : This loads adjustment values set in memory
1 through 8.
[SAVE PRESETTING] : This takes the adjustment values set for No.
1 through No. 4 and saves them as [PRESETTING 1] through [PRE-
SETTING 8]. You can save up to eight adjustment-value patterns.
[TEST PRINT]: This prints a test pattern for adjustment use.
[FEED SETTING]: This sets the adjustment value for the media-
feed direction.
[SCAN SETTING]: This sets the adjustment value for the left-right
direction (the carriage-movement direction).
[AUTO]: Alignment of the printing and cutting positions is performed
automatically.
This corrects for errors in the amount of feed of the grit rollers due
the type of media.
Be sure to make this setting when you have replaced the media with
a different type.
Make this setting again when horizontal stripes are plainly visible on
printing results.
[TEST PRINT]: This menu is for verifying the adjustment.
[SETTING]: This sets the correction value.
This corrects for the cutting length (distance correction) when using
the machine for cutting only. When using the machine for printing
and cutting, always set the offset value to [0].
[FEED SETTING]: This sets the adjustment value for the media-
feed direction.
[SCAN SETTING]: This sets the adjustment value for the scan di-
rection (the carriage-movement direction).
Top menu
EDGE
DETECTION
HEAD HEIGHT
ADJUST
BI-DIR
PRINT - CUT ADJ.
CALIBRATION
Submenu
—
—
TEST PRINT
SETTING NO.1
SETTING NO.2
SETTING NO.3
SETTING NO.4
LOAD PRESETTING
SAVE PRESETTING
TEST PRINT
FEED SETTING
SCAN SETTING
AUTO
PRINTING ADJ.
CUTTING ADJ.