


Unit 6: Maintenance
SATO GT4xxe Series Operator Manual PN 9001138C Page 6-3
REPLACEMENT PROCEDURES
This unit contains step-by-step instructions for the removal and replacement of all primary
components and sub-assemblies.
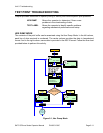
PRINT HEAD REPLACEMENT
If the print head becomes damaged or worn, it can be easily removed and replaced without
having to make critical adjustments.
1 Switch off the printer and disconnect the power supply cord.
2 Open the top housing cover.
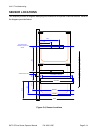
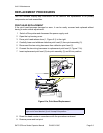
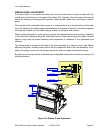
3 Press print head release lever (1, Figure 6-1) to the right.
4 Carefully lower and withdraw defective print head (2) from print assembly (3).
5 Disconnect the two wiring harnesses from defective print head (2).
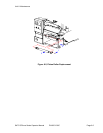
6 Connect the two wiring harnesses to replacement print head (2, Figure 7-1b).
7 Insert replacement print head (2) into print assembly (3) and lift into position.
Figure 6-1a, Print Head Replacement
8 Reset the head counter in accordance with the procedures enclosed.
9 Restore power and test print.
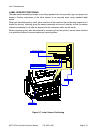
NOTE: Lift the left end of head bracket (4) onto shaft (5) first. Then lift the
right end of head bracket (4) until it snaps into position.
1
3
2