


KVM-8 Installer/User Guide
32
Appendices
33
FLASH Upgrading
To upgrade the FLASH code on your KVM Switch, you will rst need to obtain the
latest FLASH rmware revision. It is available online at www.sharkrack.com/kvm.
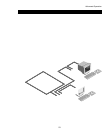
Next you will need a serial cable (available at most electronics stores) to connect a
computer to your KVM Switch. Simply connect the serial cable between the SETUP
port on your KVM Switch to the serial port on the computer.
You will then need some form of terminal software on your attached computer so that
it can communicate with the KVM Switch. There are several that are commercially
available. Select one that you are comfortable with and be sure that it can communicate
at 38,400 baud.
Congure your terminal program to the following settings:
38,400 Baud
8 Bits
No Parity
1 Stop Bit
No Flow Control
Activate the OSD menu on your KVM Switch by tapping the Control key twice. Enter
Control twice more to activate the Administrator Commands screen and then select
“Administrator Functions.”
Use the down arrow key to highlight the menu selection for “FLASH Upgrade”, then
press Enter.
A menu screen will appear and ask if you wish to continue. You must type out the word
Yes before proceeding. Once you have done this, the Switch will go into a standby
mode and wait for data from the computer.
Note: The keyboard, video and mouse are disabled during the FLASH upgrade.
The nal step is to send the FLASH le from your terminal program. To do this, you
will need to use the transfer function of your communications software. Send the
FLASH le using the XMODEM protocol. The transfer should be completed within
four minutes.
The KVM Switch will automatically check the upgrade and make sure that it is valid.
If the Switch detects an error it will abort the upgrade and prompt you to re-transfer the
le. Otherwise, it will return the message “Flash Upgrade Successful.”