


13
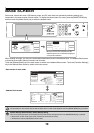
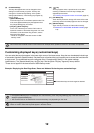
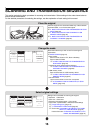
[Image Settings] key
When the [Image Settings] key is touched, the [Special Modes] key and keys for selecting scan settings appear.
The current setting of each scan setting key appears in the top of the key.
(1) [Exposure] key
Touch this key to select the exposure for scanning.
☞ Scan mode:
CHANGING THE EXPOSURE AND EXPOSURE
MODE (page 31)
USB memory mode:
CHANGING THE EXPOSURE AND EXPOSURE
MODE (page 50)
Internet fax mode:
CHANGING THE EXPOSURE (page 65)
(2) [Resolution] key
Touch this key to select the resolution for scanning.
☞ Scan mode:
CHANGING THE RESOLUTION (page 33)
USB memory mode:
CHANGING THE RESOLUTION (page 52)
Internet fax mode:
CHANGING THE RESOLUTION (page 66)
(3) [Original] key
Touch this key to select the original size, the original
orientation, two-sided scanning, and the send size.
☞ Scan mode:
AUTOMATICALLY SCANNING BOTH SIDES OF
AN ORIGINAL (2-Sided Original) (page 34)
SPECIFYING THE ORIGINAL SCAN SIZE AND
SEND SIZE (Enlarge/Reduce) (page 35)
USB memory mode:
AUTOMATICALLY SCANNING BOTH SIDES OF
AN ORIGINAL (2-Sided Original) (page 53)
SPECIFYING THE ORIGINAL SCAN SIZE AND
SEND SIZE (Enlarge/Reduce) (page 54)
Internet fax mode:
AUTOMATICALLY SCANNING BOTH SIDES OF
AN ORIGINAL (2-Sided Original) (page 67)
SPECIFYING THE ORIGINAL SCAN SIZE AND
SEND SIZE (Enlarge/Reduce) (page 68)
(4) [Colour Mode] key
Touch this key to select the colour mode for scanning.
This key does not appear in Internet fax mode.
☞ Scan mode:
CHANGING THE COLOUR MODE (page 39)
USB memory mode:
CHANGING THE COLOUR MODE (page 58)
(5) [File Format] key
Touch this key to change the file format (file type) for the
scanned image file.
☞ Scan mode:
CHANGING THE FILE FORMAT (page 40)
USB memory mode:
CHANGING THE FILE FORMAT (page 59)
Internet fax mode:
CHANGING THE FILE FORMAT (page 72)
(6) [Special Modes] key
Touch this key to use a convenient special mode. Open
the special modes screen from here when "Customize
Key Setting" in the system settings (administrator) has
been changed so that the [Special Modes] key is not
displayed in the base screen.
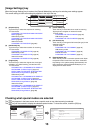
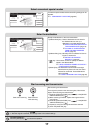
Checking what special modes are selected
The key appears in the base screen when a special mode or two-sided scanning is selected.
The key can be touched to display the selected special modes. To close the screen, touch the [OK] key.
Quick File
File
Special Modes
Address Entry
Address Book
Scan
Mode Switch
Send Settings
Auto
Exposure
200X200dpi
Resolution
PDF/PDF
File Format
Mono2/Auto
Colour Mode
Special Modes
Auto A4
Original
Image
Settings
(1)
(5)
(4)
(2)
(3)
(6)
Quick File
File
Special Modes
Address Entry
Resend
Address Book
Scan
Mode Switch
Send Settings
Ready to send.
Function Review
OK
1/3
Edge:10mm
Centre:10mm
Day of the Week:Monday
Time:21:30
:
:
On
:
Timer
Erase
Job
Build
Image
Settings