


50
CHANGING THE EXPOSURE AND
EXPOSURE MODE
The exposure can be changed to match the darkness of the original. The exposure mode can be changed to match the
original type.
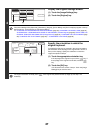
1
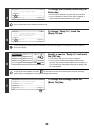
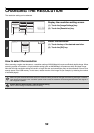
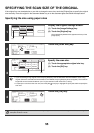
Display the exposure setting screen.
(1) Touch the [Image Settings] key.
(2) Touch the [Exposure] key.
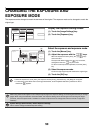
2
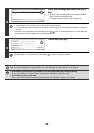
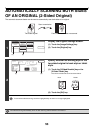
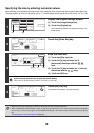
Select the exposure and exposure mode.
(1) Touch the [Manual] key.
(2) Adjust the exposure with the keys.
When the exposure is set to [Auto], the keys
cannot be used.
The exposure darkens when the key is touched,
and lightens when the key is touched.
To return to auto exposure adjustment, touch the [Auto]
key.
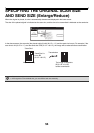
(3) Select the exposure mode.
Touch the original type key that matches the original type.
(4) Touch the [OK] key.
• When the exposure is set to [Auto], the exposure modes [Photo], [Printed Photo], and [Map] do not appear.
• To reduce the moiré effect when scanning printed matter, touch the [Moiré Reduction] checkbox so that a
checkmark appears.
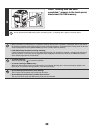
When using the document glass to scan multiple original pages, the exposure setting can be changed each time you change
pages. When using the automatic document feeder, the exposure setting cannot be changed once scanning has begun.
(However, when the special mode "Job Build" is used, the exposure can be changed each time a new set of originals is
inserted.)
System Settings (Administrator): Default Exposure Settings
This is used to change the default exposure setting.
Special Modes
USB Mem. Scan
Mode Switch
Image
Settings
File Name
Auto
Exposure
200X200dpi
Resolution
PDF/PDF
File Format
Mono2/Auto
Colour Mode
Special Modes
Original
Auto A4
(1) (2)
USB Mem. Scan
Exposure
OK
Auto
Manual
Text/
Prtd.Photo
Text/Photo
Printed
Photo
Text
Moiré Reduction
Photo
Map
1 5
3
(2) (3)
(4)(1)