


89
3
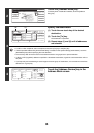
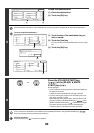
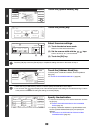
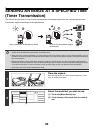
Touch the [Special Modes] key.
4
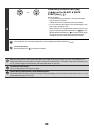
Touch the [Erase] key.
5
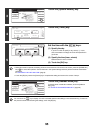
Select the erase settings.
(1) Touch the desired erase mode.
Select one of the three erase modes.
(2) Set the erasure width with the keys.
0 mm to 20 mm (0" to 1") can be entered.
(3) Touch the [OK] key.
Touch the [OK] key next to the [Cancel] key to complete the setting and return to the screen of step 4.
6
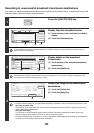
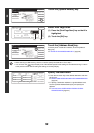
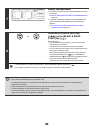
Touch the [Address Book] key.
To directly enter a destination address, touch the [Address
Entry] key.
☞ ENTER THE ADDRESS MANUALLY (page 23)
• When scanning to USB memory, there is no need to specify the destination. Go to step 8.
• You can touch the key to display a list of the selected special mode settings or two-sided scanning. To return
to the previous screen after checking the settings, touch the [OK] key.
7
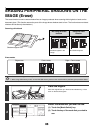
Specify the destination.
• Touch the one-touch key for the desired destination and then
the [To] key.
☞ SPECIFYING DESTINATIONS IN THE ADDRESS
BOOK (page 19)
• To specify a destination address in a global address book,
touch the [Global Address Search] key and specify the
address.
☞ CALLING UP A DESTINATION FROM A GLOBAL
ADDRESS BOOK (page 24)
Quick File
File
Special Modes
Address Entry
Resend
Scan
A4
Send
Address Book
Scan
Mode Switch
Image
Settings
Send Settings
Ready to send.
Auto
Scan
Special Modes
OK
1/2
Program
Timer
Erase
Suppress
Background
Card Shot
Dual Page
Scan
Special Modes
Erase
OK
OKCancel
Edge
10
(0 20)
mm
Edge
Erase
Centre
Erase
Edge+Centre
Erase
(1) (2) (3)
Quick File
File
Special Modes
Address Entry
Resend
Scan Send
Address Book
Scan
Mode Switch
Image
Settings
Send Settings
A4
Ready to send.
Auto
AAA AAA
CCC CCC
EEE EEE
BBB BBB
DDD DDD
FFF FFF
ABCD EFGHI JKLMN OPQRST UVWXYZ
1/1
Frequent Use
To
Sort Address
Address Review
Condition
Settings
Global
Address Search
BccCc