


-23
Setting up the Projector Using RS-232C or Telnet
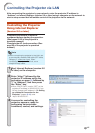
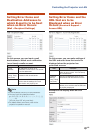
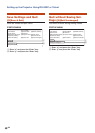
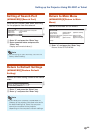
View Setting Detail List
([V]View All Setting)
▼SETUP MENU
-----------------------------SETUP MENU----------------------------
[1]IP Address [2]Subnet Mask [3]Default Gateway
[4]User Name [5]Password
[6]RS-232C Baud Rate [7]Projector Name [8]DHCP Client
[A]Advanced Setup [D]Disconnect All
[V]View All Setting [S]Save & Quit [Q]Quit Unchanged
setup>v
Model Name : XX-XXXX
Projector Name : XX-XXXX
MAC Address : XX:XX:XX:XX:XX:XX
DHCP Client : Disable
IP Address : 192.168.150.2
Subnet Mask : 255.255.255.0
Default Gateway : Not Used
RS-232 Baud Rate : 9600 bps
Password : Not Required
**********(Advanced Status)**********
Data Port : 10002
Accept IP Address : Accept All
Auto Logout Time : 5 minutes
Search Port : 5006
*
1
1 Enter “v” and press the “Enter” key.
Display all setting values(*).
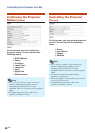
Enter number or symbol of item to be selected on the SETUP MENU. When setting, input
the details to be set. Setting is carried out one item at a time, and saved at the end.
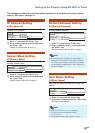
Set Items
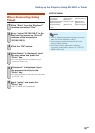
Example: When setting IP Address (change
from 192.168.150.2 to 192.168.150.3)
▼SETUP MENU
-----------------------------SETUP MENU----------------------------
[1]IP Address [2]Subnet Mask [3]Default Gateway
[4]User Name [5]Password
[6]RS-232C Baud Rate [7]Projector Name [8]DHCP Client
[A]Advanced Setup [D]Disconnect All
[V]View All Setting [S]Save & Quit [Q]Quit Unchanged
setup>1
IP Address : 192.168.150.2
Please Enter : 192.168.150.3
(change)
—> 192.168.150.3
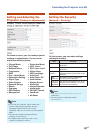
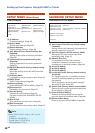
-----------------------------SETUP MENU----------------------------
[1]IP Address [2]Subnet Mask [3]Default Gateway
[4]User Name [5]Password
[6]RS-232C Baud Rate [7]Projector Name
[8]DHCP Client
[A]Advanced Setup [D]Disconnect All
[V]View All Setting [S]Save & Quit [Q]Quit Unchanged
setup>v
Model Name : XX-XXXX
Projector Name : XX-XXXX
MAC Address : XX:XX:XX:XX:XX:XX
DHCP Client : Disable
IP Address : 192.168.150.3
Subnet Mask : 255.255.255.0
Default Gateway : Not Used
RS-232C Baud Rate : 9600 bps
Password : Not Required
**********(Advanced Status)**********
Data Port : 10002
Accept IP Address : Accept All
Auto Logout Time : 5 minutes
Search Port : 5006
1
*1
2
*2
3
*3
1 Enter “1” (number of item to be set), and
press the “Enter” key.
Display current IP address (*1).
2 Enter IP address to be set and press the
“Enter” key.
Display IP address after change (*2).
3 Enter “v” and press the “Enter” key to verify
setting detail list.
IP address is being changed (*3).
Verifi cation of setting detail list can be omitted.
Setting details are not effective until they have
been saved. (Page
24)
If an invalid number is entered, an error
message (“Parameter Error!”) will be displayed.
•
•
•
Note