


14
Setup & Connections
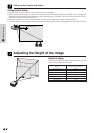
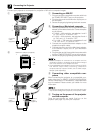
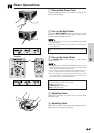
Adjusting the Height of the Image
1 Press the foot release and lift the projector to the
desired angle.
2 Remove your hand from the foot release. Once
the adjustment foot has locked in position, release
the projector.
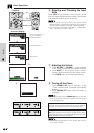
Returning the projector to its original position
While holding the projector, press the foot release and slowly
lower the projector to its original position.
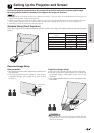
• The projector is adjustable up to approximately 5° from the
standard position.
• When an adjustment is made, the image may become
distorted (keystoned), depending on the relative positions
of the projector and the screen.
CAUTION
• Do not press the foot release when the adjustment foot is
extended without firmly holding the projector.
• Do not hold the lens when lifting or lowering the projector.
• When lowering the projector, be careful not to get your
fingers caught in the area between the adjustment foot and
the projector.
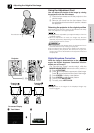
Using the Adjustment Foot
You can adjust the height of the image by raising
the projector with the foot release.
Foot release
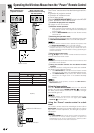
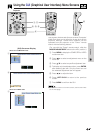
Digital Keystone Correction
When the image is distorted due to the projection
angle, the Digital Keystone Correction function
allows you to correct it.
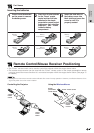
(For use with the “Power” remote control, slide the
MOUSE/ADJUSTMENT switch to the ADJ. position.)
1 Press KEYSTONE.
2 Press ∂ to compress the upper part of the image.
Press ƒ to compress the lower part of the image.
3 Press ENTER to display a test pattern.
4 Press ENTER to clear the test pattern.
5 To exit, press KEYSTONE.
6 To reset, press LEFT-CLICK.
Pressing
ƒƒ
ƒƒ
ƒ
in Step 2
Pressing
∂∂
∂∂
∂
in Step 2
Projector
• Straight lines or the edges of the displayed image may
become jagged.
ON
MUTE
TOOLS
R-CLICK ENTER
INPUT
MOUSE
LIGHT
ADJ.
IrCOM
FREEZE
AUTO SYNC
KEYSTONE
ENLARGE
MENU
LASER
BLACK
SCREEN
VOL
OFF
R/C
OFF
ON
3, 4
1, 5
2
6
MOUSE
ADJ.
g
44
44
4
33
33
3 Test Pattern
On-screen Display