


17
Setup & Connections
Connecting the Projector
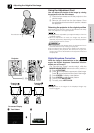
“Plug and Play” Function
This projector is compatible with VESA-standard DDC 1/DDC 2B. The projector and a VESA DDC compatible
computer will communicate their setting requirements, allowing for quick and easy setup.
• The DDC, Plug and Play function of this projector operates only when used in conjunction with a VESA DDC compatible
computer.
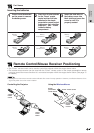
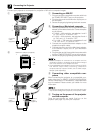
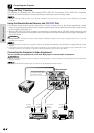
Using the Remote Mouse Receiver and RS-232C Port
• The remote mouse receiver can be used with the “Power” remote control or the simple presentation remote
control to operate the computer’s mouse. Plug the supplied mouse control cable from the remote mouse receiver
to the computer. (See page 16.)
• When the RS-232C port on the projector is connected to a computer with an RS-232C cable (cross type, sold
separately), the computer can be used to control the projector and check the status of the projector. See pages 41
and 42 for details.
CAUTION
• Do not connect or remove the mouse control cables or RS-232C cable to or from the computer while it is on. This may
damage your computer.
• The wireless mouse functions can operate computers compatible with IBM PS/2, serial (RS-232C) or Apple ADB type mouse
systems.
• The wireless mouse or RS-232C function may not operate if your computer port is not correctly set up. Please refer to the
operation manual of the computer for details on setting up/installing the correct mouse driver.
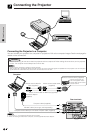
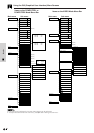
Connecting the Projector to Video Equipment
You can connect your projector to a VCR, laser disk player or external audio components.
CAUTION
• Always turn off the projector while connecting to video equipment, in order to protect both the projector and the equipment
being connected.
• By using external audio components, the volume can be amplified for better sound.
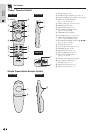
Rear terminals
Use this terminal when the audio-
visual equipment to be connected has
an S-VIDEO output terminal.
VCR Amplifier
To S-video
output
terminal
To audio
input
terminals
To audio
output
terminals
To video
output
terminal