


18
Operation
Basic Operations
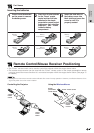
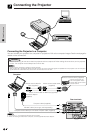
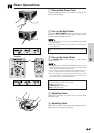
1 Connect the Power Cord
Plug the supplied power cord into the AC socket on the
back of the projector.
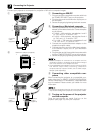
2 Turn on the Main Power
Press the MAIN POWER switch on the back of the
projector. The POWER indicator lights up red and the
projector enters standby mode.
• If the bottom filter cover is not securely installed, the POWER
indicator flashes.
• When the main power is not on, the “Power” remote control
cannot be used.
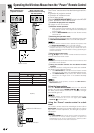
3 Turn on the Lamp Power
Press POWER ON on the projector or the “Power”
remote control.
• The flashing green LAMP REPLACEMENT indicator shows
that the lamp is warming up. Wait until the indicator stops
flashing before operating the projector.
• If the power is turned off and then immediately turned on
again, it may take a short while before the lamp turns on.
• After the projector is unpacked and turned on for the first
time, a slight odour may be emitted from the exhaust vent.
This odour will soon disappear with use.
5
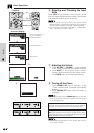
4
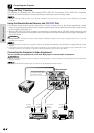
When the main power is on, the POWER indicator lights up
red.
When the power is on, the LAMP REPLACEMENT indicator
lights indicating the status of the lamp.
Green: Lamp is ready.
Flashing green: Warming up.
Red: Change the lamp.
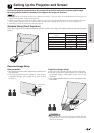
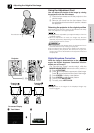
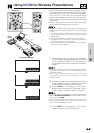
4 Adjusting Focus
Slide the focus knob until the image on the screen
becomes clear.
5 Adjusting Zoom
Slide the zoom knob. The image can be adjusted to the
desired size within the zoom range.
Projector
ON
MUTE
TOOLS
R-CLICK ENTER
INPUT
IrCOM
FREEZE
AUTO SYNC
MENU
LASER
BLACK
SCREEN
VOL
OFF
3
1
2