


ENGLISH
3
QUICK SET-UP GUIDES
PSM
R
200 Wireless System
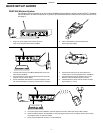
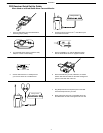
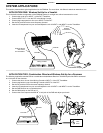
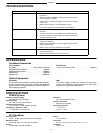
The following set-up illustration is for the complete PSM200 Wireless System, which includes the P2T TransMixer,
the P2R Receiver, and the E2 Earphones. If you have purchased the P2R as a stand-alone wired personal monitor,
see page 4.
CHANNEL
SELECT
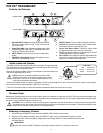
PSM200 TransMixer
MIC/LINE1
MIC/LINE2
1
INPUTS
2
1. Plug in the power supply and connect it to the DC
input on the rear panel of the P2T TransMixer.
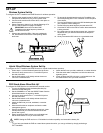
2. Insert a 9 Volt battery into the P2R Receiver,
observing proper polarity.
3. Connect audio sources to the MIC/LINE INPUTS on the front
panel of the TransMixer.
4. Turn the Receiver volume knob clockwise past the click (ON).
Keep the volume at a low setting.
5. Set the TransMixer and Receiver to the same frequency chan-
nel. See the Selecting a Frequency Channel section on page 6.
6. Check the RF LED on the top of the Receiver to
confirm that it is receiving signal from the TransMixer.
7. Plug the Earphones into the earphone jack on the
Receiver. Insert the Earphones into your ears.
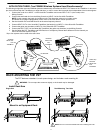
8. Increase Receiver volume until the knob is turned to
approximately 11 o’clock.
9. On the front panel of the TransMixer, adjust the signal level of each audio input with the INPUT knobs.
10. Check the INPUT LEDs on the TransMixer to verify that signal is present, but not clipping. See the Audio Inputs
and Outputs section on page 6 for details.
11. Slowly adjust the Receiver volume to a comfortable level.
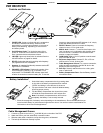
CHANNEL
SELECT
PSM200 TransMixer
MIC/LINE1
MIC/LINE2
1 INPUTS
2
Mixing Console
Mixing Console