


ENGLISH
7
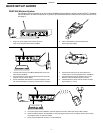
P2R RECEIVER
Controls and Features
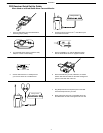
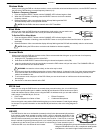
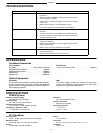
1
23
4
5
6
7
8
9 10
11
12
13
1. POWER LED: Lights to indicate the unit is powered on
and blinks to indicate low battery. When this LED
starts blinking, you have approximately 15 minutes of
battery time remaining, depending on volume level
and battery brand.
2. On/Off/Volume Knob: Turn clockwise past click to
power on. Continue to turn clockwise to increase vol-
ume, counterclockwise to decrease volume.
3. LIM LED: Lights only when limiter is activated. See the
LIM LED section on page 8 for details.
4. RF LED: Lights when the unit is receiving radio frequency
(RF) signal from the P2T TransMixer.
5. Antenna: An attached, flexible whip antenna receives RF
signal from the TransMixer.
6. CHANNEL LED Indicator: Displays the number of the
current frequency channel (1-8), or the letter “A” for
wired mode. The CHANNEL LED indicator shuts itself
off after 10 seconds to conserve battery life. To view the
frequency channel when the LED indicator is off, simply
press and release the SELECT button.
7. SELECT Button: Press to increment the frequency
channel or set to “A” for wired mode.
8. MIX IN Jack: Connect a
1
/
4
-inch line-level input to this
jack. Use alone, or in combination with wireless recep-
tion from the P2T TransMixer. See the MIX IN Jack
section on page 8 for details.
9. GAIN Switch: Slide to HI or LO position to set the sensi-
tivity of the MIX IN input.
10. Earphone Output Jack: Connect E1, E2, or E5 ear-
phones to this
1
/
8
-inch (3.5mm) jack.
11. Cable Management Groove: For a secure connection,
guide the cable connected to the MIX IN Jack or the
earphone cord into this groove.
12. Belt Clip: Securely attaches the unit to a belt, guitar
strap or waist band.
13. Battery Compartment Door: See the Battery Installa-
tion section below.
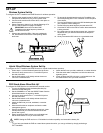
Battery Installation*
1. Unlock the battery compartment door by pressing down
on the side of the battery compartment door marked
“OPEN” and sliding it in the direction of the arrow.
2. Flip open the door and insert a fresh 9V alkaline battery,
observing proper polarity.
3. Flip the battery compartment door closed, then press
and slide the compartment door until it snaps shut.
Note: If the battery compartment door will not close
completely, the battery is not correctly inserted.
* Since the average life of a battery varies depending on the manufacturer, Shure recommends that you
use a fresh 9V battery for performances longer than two hours. You can then reserve used batteries for
rehearsals or other less critical applications.
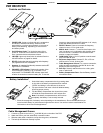
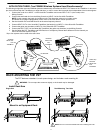
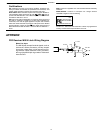
Cable Management Groove
1. Connect an audio source to the
1
/
4
-inch MIX IN jack on the side of the P2R.
2. Attach the P2R to your belt, waist band, or another location.
3. Slide the audio cable or earphone cord up into the groove, as illustrated.
4. The belt clip will hold them securely in place.