


16 PMWT-660/680 Installation Guide
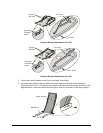
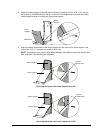
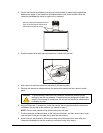
Finally, route the cables behind the interactive whiteboard.
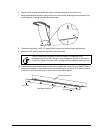
NOTES
• The cables supplied with the NEC WT600 or WT610 projector are unlikely to be long enough
to reach the power outlet and the computer. You must purchase longer cables if you need
them.
• Make sure the cables are not caught between the wall and those portions of the interactive
whiteboard that touch the wall.
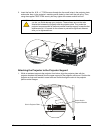
Adjusting the Projected Image on the Interactive Whiteboard
NOTE: Don’t adjust the projected image until after you’ve set your computer to the projector’s
native resolution: 1024 × 768. Also, don’t use a logon screen for adjusting the image. Wait until the
desktop appears.
After you unlock and lower the projector’s mirror cover, you can adjust the position of the projected
image in a variety of ways:
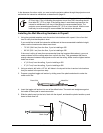
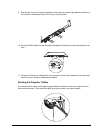
• To reduce or enlarge the image, move the projector toward or away from the interactive
whiteboard by sliding it along the slots in the projector plate. Be sure to tighten the screws in
those slots when you’re finished.
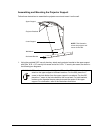
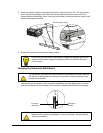
• Use the projector’s feet to make adjustments as well. To lower one side of the projector, loosen
the feet on that side of the projector slightly. To lower the front or back of the projector, loosen
the front or back feet slightly.
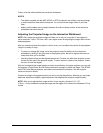
After you’ve adjusted the image location as much as possible by moving the projector, you can use
the projector’s Digital Zoom and 3D Reform features to enlarge or reduce the image. The WT600
and WT610 also feature keystone, pincushion and cornerstone correction. See the projector
owner’s manual for details.
Position the image to the greatest extent you can by moving the projector. Although you can make
additional adjustments digitally, digital adjustment can degrade the projected image’s quality.
NOTE: After you’ve adjusted the image position, there may be a border of 1/4"–1/2"
(0.6 cm–1.3 cm) between the projected image and the edges of the interactive whiteboard. This is
normal.