


43
GB
Printing from a PC
Tips
• To select a series of still images in the image area
of the main window, click the first image in the
series and then click the last image while pressing
the Shift key. To select multiple still images not in
a sequence, click the images individually while
pressing the Ctrl key.
• You can also print from an image preview.
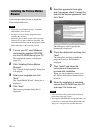
The Picture Motion Browser does not allow
you to view images saved on the PC hard disk
directly. You must first register the browsing
folder as follows:
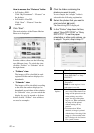
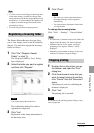
1 Click “File”-“Register Viewed
Folder”, or click .
The “Register Folders to View” dialog
box is displayed.
2 Select the folder you want to register
and then click “Register”.
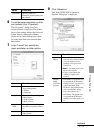
Note
You cannot register the whole drive.
The confirmation dialog box used for
registration is displayed.
3 Click “Yes”.
Registration of the image information in
the data base starts.
4 Click “Close”.
Notes
• The folder you select as the destination of
the imported images will be registered
automatically.
• You cannot cancel registration of the folder
you register here.
To change the browsing folder
Click “Tools” - “Settings” - “Viewed folders”.
Tips
• If a sub folder is contained in the source folder, the
images in the sub folder will also be registered.
• When the software is first started, a message
prompting you to register “Pictures” will be
displayed.
• Depending on the number of images, it may take
some tens of minutes to register images.
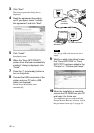
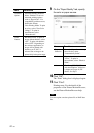
1 Double-click on the printer icon on
the taskbar, and open the “Print”
dialog box.
2 Click the document name that you
want to cancel printing of and then
click “Cancel” from the “Document”
menu.
The dialog box used for confirming the
deletion is displayed.
3 Click “Yes”.
The printing job is canceled.
Note
Do not remove the job being printed. Doing so may
cause a paper jam.
Registering a browsing folder
Stopping printing
Continued