24
GB
Making an ID photo
1 From the main menu (page 18),
press g/G/f/F to select (ID
Photo) and then press ENTER.
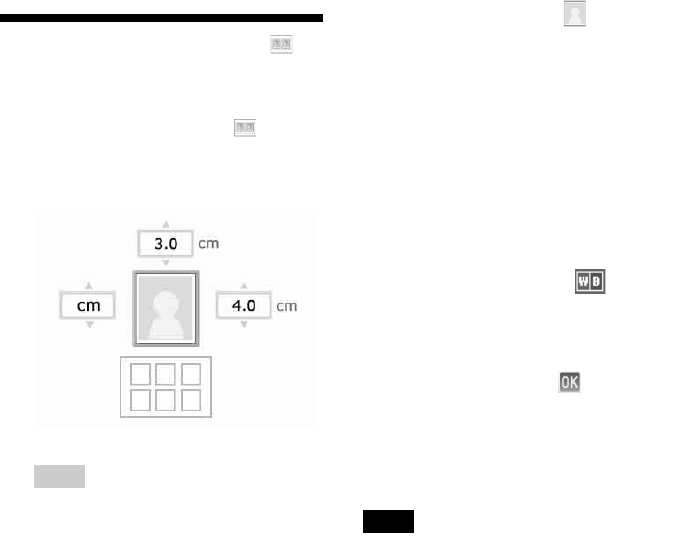
The window used for setting the height
and width of an ID Photo is displayed.
Tip
You can set a maximum size of 7.0 (width) x
9.0 (height) cm.
2 Press g/G/f/F to select “Height” or
“Width” to be adjusted and press
ENTER.
The cursor moves to the number input
area of the selected item.
• To specify the unit: Select either “cm” or
“inch”.
• To specify the height: Select the figure box
at the right of the photo frame.
• To specify the width: Select the figure box
in the upper of the photo frame.
3 Press f/F to set the size and then
press ENTER.
The ID photo preview of the specified size
is displayed.
4 If you want to specify another size,
repeat steps 2 and 3.
5 Press f/F to select and press
ENTER.
The window used for selecting an image is
displayed.
6 Press g/G/f/F to select the desired
image, and then press ENTER.
The window used for adjusting the image
position is displayed.
For adjustment, see step “Adjusting an
image” on page 21.
You can also change a color photo into a
monochrome one. Select
(Monochrome) and press ENTER. You
can select this option while making an ID
Photo.
7 Press g/G to select and press
ENTER.
A preview of the ID photo print is
displayed.
8 Press PRINT.
Note
An ID photo printed may not be able to be acceptable
for use in an identification card or passport. Please
check the requirements for the photo to be used in the
instructions before you submit the card or passport.
