


Sony VAIO Desktop User Guide
Getting help
77
nN
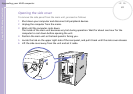
I cannot print
❑ Check that all the cables of the printer are properly connected.
❑ Check the cable to see if the pins are bent or missing completely.
❑ Try a printer self test (if available) to see if the printer itself is still working properly. For more
information, please consult the manual supplied with your printer.
❑ Some printers have a specific installation procedure. Please check the manual supplied with your printer.
❑ Check that your printer is correctly configured and that you have up-to-date drivers. If necessary, contact
your dealer.
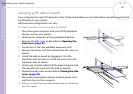
❑ Try resetting the printer connection, as follows:
1 From the Control Panel, select Printers and Other Hardware, then Printers and Faxes.
2 Click the icon of the printer installed on your computer.
3 In the Printer Tasks menu, which has now expanded, click Set printer properties.
4 Have a look through the different tabs and check for abnormalities.
5 Restart your computer.
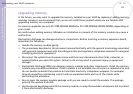
❑ The default setting for the printer port mode is correct for most printers, but you can try to change the
printer port mode, as follows:
1 Turn on the computer and press <F2> when the Sony logo appears.
The BIOS setup menu screen appears.
2 Use the keyboard’s arrow keys to select the Advanced menu.
3 Select I/O Device Configuration, then press the <Enter> key.
4 Select Parallel Port Mode, then press the <Enter> key.
5 Select a printer port option using the arrow keys, then press <Enter>.
The documentation delivered with your printer should give you the relevant port option.