


13
CARE AND CLEANING
All care and cleaning operations should be carried out with
the unit unplugged from the mains power.
The surface of the unit can be cleaned with a barely damp
cloth and then dried carefully. Never use abrasives, abrasive
cloths or chemical solvents .
SPECIFICATIONS
Supply Voltage, Current : . 5V , 2A
AC Adaptor input: ............100-240V ~, 0,5A max.
Net Weight: ..................... 914 g
Class II construction double insulated.
This product must not be connected to earth.
CARE AND MAINTENANCE
SPECIFICATIONS
UK: Waste electrical products/batteries should
not be disposed of with household waste.
Separate disposal facilities exist, for your near-
est facilities see www.recycle-more.co.uk or
in-store for details.
ROI: Produced after 13th August 2005. Waste
electrical products/batteries should not be
disposed of with household waste. Please
recycle where facilities exist. Check with your
Local Authority or retailer for recycling advice.
WARRANTY
WARRANTY
Your Tesco appliance is covered by a warranty for 12 months
from the date of purchase. If a fault develops during this
period, please contact the TESCO electrical help line on 0845
456 6767. Please have your original purchase receipt with
you when you call. This warranty in no way aects your
consumer rights.
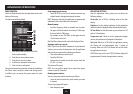
TROUBLESHOOTING
Poor quality radio reception
The aerial signal may not be adequate. Try repositioning the
aerial wire (FM).
Clock or alarms will not set
You may have an iPhone docked with the Technika application
running. Stop the application or remove the iPhone if you want
to set the clock or alarm manually.
Alarm not sounding
Check that you have set the correct alarm time, and set
the alarm to wake you (wake-up mode symbol(s) will be
displayed). Check also that the unit is set to Standby before
you go to bed.
If you have docked an iPhone with the application running,
check that the alarm settings are correctly made in the
application.
No sound/low volume from AUDIO IN source:
Check that the volume control is turned up on the AUX source.
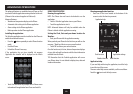
No display:
The display dimmer may have been set to low (no backlight).
Press the SNOOZE/DIMMER button to restore the backlight
.
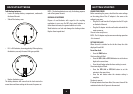
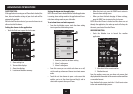
SLEEP FUNCTION
SLEEP TIMER
You can set the Sleep timer to play music for a set period
while you are falling asleep.
To set the sleep timer:
Play your choice of music.•
Press and • hold the SNOOZE/SLEEP button to set sleep
mode.
The display will ash ‘00’.•
Press the • SET+/} or SET-/{ button to set your choice
of sleep time in the range 10 minutes to 90 minutes in
10 minute intervals. Pressing once more beyond the 90
minute setting will cancel Sleep mode (set to 00).
Press the • /, button to conrm the sleep time setting.
When Sleep mode is set the Sleep indicator ‘ZZZ’ will be
displayed and the music will continue to play for the time you
selected. The unit will then set to Standby.
Checking the sleep time remaining:
If you want to check the sleep time remaining during the •
sleep period, press the SLEEP button.
The remaining sleep time will be displayed.•
Cancelling sleep mode:
To cancel Sleep mode, set the unit to Standby.•