


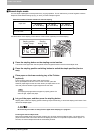

3 BASIC COPY MODES
82 Selecting Finishing Mode
Manual staple mode
You can staple copied paper manually without any copying operation. This is useful when you have forgotten to set the
staple sort mode before starting copying, or when you want to staple originals.
Maximum number of sheets available for manual stapling
Use the buttons on the stapling control section of the Finisher (optional) for manual stapling.
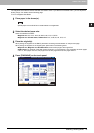
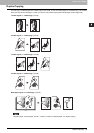
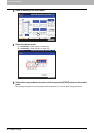
1
Press the stapling button on the stapling control section.
The shutter of the paper exit area is opened and this equipment enters into the manual staple mode.
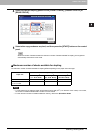
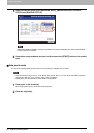
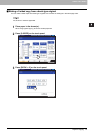
2
Press the stapling position switching button to switch the staple position (front or
rear).
4
Let go of the paper, and then press the stapling button.
Stapling starts. When the stapling position switching lamps start blinking, it means the stapling has finished. Then
remove the stapled paper.
Be sure that your hands are away from the paper while stapling is in progress.
Finishing the manual staple mode
Remove the stapled paper from the lower receiving tray, and then press the stapling button. The shutter of the
paper exit area closes. This means that manual stapling is finished. If no operation is performed for approx. 15
seconds, the manual staple mode will be automatically finished.
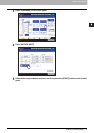
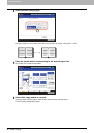
Paper size
Paper weight
64 - 80 g/m
2
(17 - 20 lb. Bond)
81 - 90 g/m
2
(21 - 24 lb. Bond)
91 - 105 g/m
2
(25 - 28 lb. Bond)
A4, B5, LT 50 sheets 50 sheets 30 sheets
A3, A4-R, B4, FOLIO, LD,
LG, LT-R, COMP
30 sheets 30 sheets 15 sheets
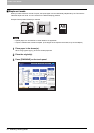
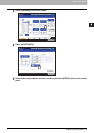
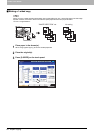
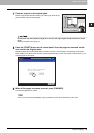
3
Place paper on the lower receiving tray of the Finisher
(optional).
Fan and jog the paper well. Place it with its face down.
When you staple them at their corner on the front side, place the
sheets of paper aligned to the front side. When you staple them on the
rear side, place the sheets of paper aligned to the rear side.
The stapling lamp lights when the paper is properly placed. If it
does not light, replace the paper.
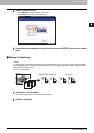
Stapling position
button / lamps
Stapling
button / lamp