


2. PRINTER SETUP ENGLISH VERSION EO1-33057
2.8 Setting an Operating Environment
E2-36
2.8.2 Dump Mode Setting
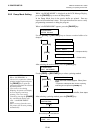
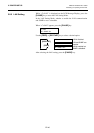
While “<4>DUMP MODE” is displayed on the LCD Message Display,
press the [PAUSE] key to enter the Dump Mode.
In the Dump Mode, data in the receive buffer are printed. Data are
expressed in hexadecimal values. This operation allows the user to verify
programming commands or debug the program.
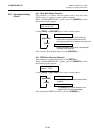
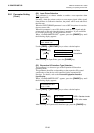
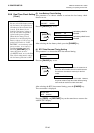
When “<4>DUMP MODE” appears, press the [PAUSE] key.
Use the [FEED] or [RESTART] key to choose a receive buffer to be
dumped.
After selecting the receive buffer, press the [PAUSE] key.
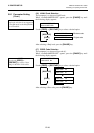
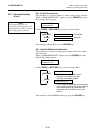
Use the [FEED] or [RESTART] key to select a printing method.
After selecting a printing method, press the [PAUSE] key.
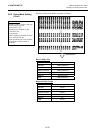
<4>DUMP MODE
BUFFER RS-232C
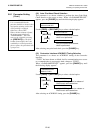
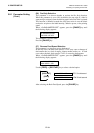
<4>DUMP MODE
NOW PRINTING...
<4>DUMP MODE
ON LINE
B-SX8T Vx.x
Turn off the power, and then on.
[PAUSE]
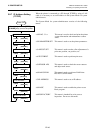
BUFFER RS-232C
BUFFER NETWORK
[RESTART]
[FEED]
BUFFER BASIC 1
BUFFER CENTRO.
BUFFER BASIC 2
BUFFER USB
<4>DUMP MODE
PRINT ON DEMAND
PRINT ON DEMAND
[RESTART]
[FEED]
Prints 166 lines of data (approx. 50cm), then
stops.
* To print the subsequent data, choose a printing
method again and press the [PAUSE] key
.
Prints all data in the receive buffer, then stops.
PRINT ALL
BASIC Interpreter (Interface → Interpreter buffer)
BASIC Interpreter (Interpreter → Printer buffer)
NOTES:
1. When “ON DEMAND” is
selected, it is required to choose a
printing method again and press
the [PAUSE] key to print the
subsequent data until the all data
has been printed.
2 If an error occurs during
dumping, the printer will display
an error message and stop
printing. The error can be
cleared by pressing the [PAUSE]
key, and then the display will
show “<4>DUMP MODE”
again.
After a recovery from the error
the printer will not start printing
automatically.