10
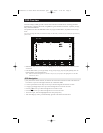
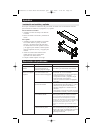
OSD Overview
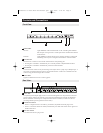
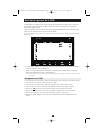
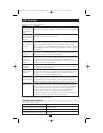
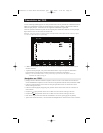
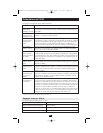
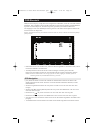
OSD Main Menu Headings:
PN Lists the Port ID numbers (Station Number – Port Number) for all the CPU
Ports on the installation. To access a particular PC, use the Navigation Keys to
move the Highlight Bar to the desired location and then press [Enter].
QV Ports that have been selected for Quick View Scan Mode (see F2 below and
F4 on page 11) are identified by an arrowhead in this column.
PC Lists all the PCs that are Powered On and are On Line.
NAME If a port has been given a name (see F5 on page 11), the name appears in this column.
The Function Keys:
Function Keys bring up submenus that are used to configure and control the OSD.
• F1 GoTo:
Pressing [F1] allows you to switch directly to a port by the following methods:
a) Move the Highlight Bar to the desired port and press [Enter].
b) Key in the Port ID or Name, then press [Enter].
Note: GoTo narrows the list of available choices as you type the name. For example, if the first letter you type is
“a”, the list only displays those ports whose names begin with “a”. If the next letter you type is “b”, the
list is further narrowed down to only those ports whose names begin with “ab”, etc.
To return to the OSD Main Menu without making a choice, press [Esc].
• F2 Scan:
Pressing [F2] initiates the Quick View Scan Mode, in which the OSD cycles through all the ports
that have been selected for Quick View Scanning (see F4 on page 11), and displays each one for the
amount of time set with the Set Scan Duration function (see F6 on page 11). When you want to stop
at a particular location, press any key to stop scanning.
Note: 1. If the scanning stops on an empty port, or one where the computer is attached but is powered Off, the
monitor screen will be blank, and the mouse and keyboard will have no effect. To recover, key in the Hot
Key sequence (see Hot Key Selection, above), for any Port ID that has an active PC attached.
2. As the OSD cycles through the selected ports, an S appears in front of the Port ID display as each
computer is accessed to indicate that the computer is being accessed under Quick View Scan Mode.
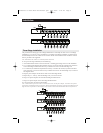
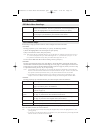
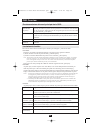
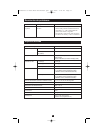
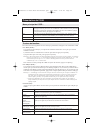
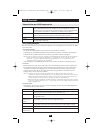
• F3 List:
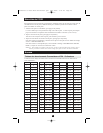
Pressing [F3] brings up a submenu that lets you control the ports which the OSD lists:
Choice Meaning
All Lists the Port ID Numbers and Names (if names have been specified, see F5 on
page 11) of all the ports in the installation.
QView Lists only the ports that have been selected for Quick View scanning
(see F4 on page 11).
Powered On + Lists only the ports that have been selected for Quick View scanning (see F4
QView on page 11) and that have their attached PC Powered On.
QView + Name Lists only the ports that have been selected for Quick View Scanning (see F4
on page 11), and have been assigned names (see F5 below).
Name Lists only the ports that have been assigned names (see F5 on page 11).
Powered On Lists only the ports that have their attached PCs powered on.
To make a choice, move the Highlight Bar to your selection, then press [Enter]. The icon that appears
before the choice indicates the current selection.
Note: 1. You can access any port on any list by using the Navigation Keys to move the Highlight Bar to it, then
pressing [Enter].
2. If you select a port that does not have a PC attached to it, or if the attached PC is powered Off, the OSD
will still switch to it, and will not show an error.