


7
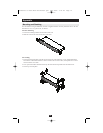
Operation
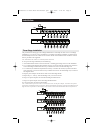
Hot Plugging
Components can be removed and added back into the installation by unplugging their cables from the
unit’s ports without the need to shut the switch down. The following procedures must performed in
order for hot plugging to work:
• Hot Plugging CPU Ports:
When hot plugging cables from the CPU ports:
1. The cable must be plugged back into the same port it was removed from.
2. The mouse cable must be plugged in before the keyboard cable.
3. After plugging the cable back in, you must perform a KVM Reset on the First Stage unit by
pressing the Reset switch.
• Hot Plugging Console Ports:
When hot plugging the mouse from the KVM Switch’s console mouse port:
1. The mouse may be removed and replaced (to reset the mouse, for example), as long as it is the
same mouse.
2. If you plug in a different mouse, all the stations and all the computers must be shut down for 10
seconds, then restarted.
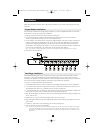
• Keyboard and Mouse Reset:
If there is no response to mouse and/or keyboard input after hot plugging (or at any other time),
simultaneously press and hold Port Select buttons 1 and 2 on the First Stage unit for 3 seconds to
perform a Keyboard and Mouse reset.
Powering Off and Restarting
If it is necessary to Power Off one of the KVM Switches, do the following before starting it back up:
1. Shut down all the computers that are attached to it, as well as all the stations and all the computers
that are daisy chained down from it (all the child stations and the computers attached to them).
Note: 1.Unplug the power cord of any PC (connected to that KVM) that has the Keyboard Power On function.
2. If the unit is operating under external power, unplug the power adapter cable.
2. Wait 10 seconds, then restart the KVM Switch, starting with the last station in the chain and
working back to the station you originally shut down.
3. After the Switches are up, power ON the PCs, starting with the ones attached to the last station in
the chain and working back to the station you originally shut down.
Note: It is not necessary to shut down and restart any of the stations or computers above the station you powered off.
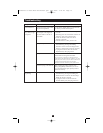
Port Selection
Controlling all the PCs connected to the Switch is very easy. The following three methods can be used:
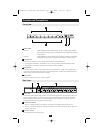
• Manual
Simply press the appropriate port selection switch on the unit’s front panel. The Selected LED will
light to indicate that the port is selected. The On Screen Display (see OSD section) automatically
switches to highlight the PC selected.
Note: On a cascaded installation, you must press the Port Selection switch on the KVM Switch that connects
directly to the PC you want to access.
• Hot Key
Press the Left [Ctrl]+[Alt]+[Shift] or Right [Ctrl]+[Alt]+[Shift] keys sequentially; key in the Port ID
number (see Port ID Numbering, section for details); then press [Enter].
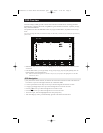
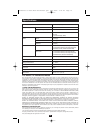
• OSD
Press either Left [Ctrl] or Right [Ctrl] twice to access the OSD Main Menu. Either:
• Invoke the Hotkey Function by pressing the Left [Ctrl]+[Alt]+[Shift] or Right [Ctrl]+[Alt]+[Shift]
keys sequentially; key in the Port ID (see Port ID Numbering section for details) and then press
[Enter], or
• Use the Arrow Keys to move the Highlight Bar to the port you want; then press [Enter]
Note: You can change the Hotkey to access the OSD Main Menu to the Scroll Lock Key (see section titled F6), in
which case you press [Scroll lock] twice (instead of [Ctrl] twice).
200603163 93-2538 B007-008 manual.qxd 4/19/2006 1:45 PM Page 7