


14
22. Starting a Remote Session
Note: Windows Vista users need to log out Internet Explorer as an
administrator. See page 5 for details.
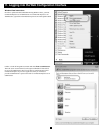
At a Client computer, open Internet Explorer (6.0 and above is required) and
type the Netcommander IP’s IP address, https://192.168.x.xxx. (Only SSL
connections are allowed, therefore type HTTPS, not HTTP before the IP
address). The Login page appears. Type your username and password and
press Enter.
On rst connection, install the Tripp Lite Certicate and ActiveX control.
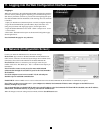
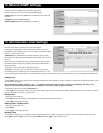
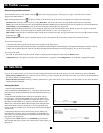
Once connected, the screen of the lowest numbered Target Server that the
user has permission to access appears. The gure below illustrates the
remote session window.
On the remote console you have the following:
Server Confirmation Label: This conrms the identity of the current server
accessed and disappears by default after 30 seconds, (this period can be
adjusted in the OSD – explained in Section II of the guide). It appears again
when switching to a different server. The currently accessed server identity
can be checked any time by looking at the Server Name on the Internet
Explorer title bar.
Toolbar Icon: This is the minimized toolbar from which you switch and
congure the system. Features of the Toolbar are explained in more detail in
the sections below.
Tripp Lite Icon: Hold the mouse over the icon to view information about
current server; connection time and video mode.
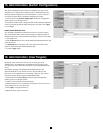
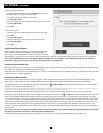
23. Taking Over a Busy Remote Session
While only one user can control the KVM and server, multiple remote users
can connect to the KVM at the same time in a “View Only” Mode. All users
will be connected to the same port. When connecting to a busy Target Server
an Administrator has the option to take over the Target Server. A User only
has this option when the current session is run by another User, but not by an
Administrator. The following message appears:
Take Over: Click the Take Over Button to gain full access to the Target
Server. (This function works the same when taking over an attached
computer/server or a cascaded KVM.) The current user will see a prompt
stating they have been taken over, and they will be pushed into View Only
Mode. Once being pushed into View Only Mode, the View Only session will
be disconnected when the other user disconnects.
View Only: Click the View Only Button to allow the current user to remain in
control of the Target Server.
Cancel: Click the Cancel Button to exit the Remote Session.