


9
11. Logging into the Web Configuration Interface (Continued)
LOgging In
When rst connecting to the NetCommander IP Web Conguration Interface,
a browser security warning appears requesting you to download Tripp Lite’s
SSL Security Certicate. Click Yes to proceed. The warning disappears upon
rst NetCommander IP client installation, when the Tripp Lite root certicate
is installed.
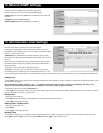
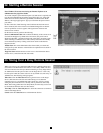
1. Open your Web browser (Internet Explorer version 6.0 or higher required).
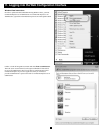
2. Type the NetCommander IP system IP address, https://192.168.x.xxx/
cong, and press Enter. The login page appears, see the gure below.
3. Type the default Administrator user name - admin - and password - access
– (case sensitive).
4. Press Enter. The Web interface opens at the Network Conguration page.
See the gure below.
Note: Bookmark the page for easy reference.
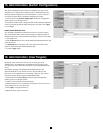
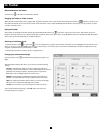
12. Network (Configuration Screen)
Consult your Network Administrator for the network settings.
Device name: Type a name for the NetCommander IP. The default device
name consists of the letter ‘D’ followed by the 6-digit device number (D.N.)
found on the silver label on the underside of the NetCommander IP.
First TCP Port: Choose 3 consecutive ports and type in the rst port
number of the series. The default port – 900 – is suitable for the majority of
installations.
Note: Firewall or router security access list must enable inbound
communication through the selected TCP ports for the NetCommander
IPs IP address.
For Client computer access from a secured LAN, the selected ports
should be open for outbound communication.
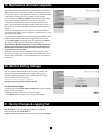
Enable DHCP – When a DHCP server is active on the same network as the NetCommander IP, the IP Address is automatically assigned.
Note: Where you have access to the server – your configured (or default) NetCommander IP device name will appear on the DHCP server’s
interface, making it easy to locate.
It is recommended that you disable DHCP, and assign a fixed IP address to the NetCommander IP. When DHCP is disabled, enter the IP Address,
Subnet Mask, and Default Gateway as given by your Network Administrator.
When all changes to network settings have been made, click the Save & Restart button.