


v
Table of Contents
Chapter 1:Overview
1.1 About the Transport GX21 B5102 . . . . . . . . . . . . . . . . . . . . . . . . .1
1.2 System Requirements . . . . . . . . . . . . . . . . . . . . . . . . . . . . . . . . . . .1
1.3 Features . . . . . . . . . . . . . . . . . . . . . . . . . . . . . . . . . . . . . . . . . . . . . .2
1.4 Unpacking . . . . . . . . . . . . . . . . . . . . . . . . . . . . . . . . . . . . . . . . . . . .3
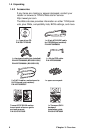
1.4.1 Box Contents (B5102G21S2H and B5102G21S2) . . . . . . .3
1.4.2 Accessories . . . . . . . . . . . . . . . . . . . . . . . . . . . . . . . . . . . . .4
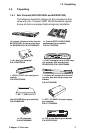
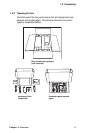
1.4.3 Opening the box. . . . . . . . . . . . . . . . . . . . . . . . . . . . . . . . . .5
1.5 About the Product . . . . . . . . . . . . . . . . . . . . . . . . . . . . . . . . . . . . . .6
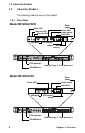
1.5.1 Front View. . . . . . . . . . . . . . . . . . . . . . . . . . . . . . . . . . . . . .6
1.5.2 Rear View . . . . . . . . . . . . . . . . . . . . . . . . . . . . . . . . . . . . . .7
1.5.3 Internal View (B5102G21S2H). . . . . . . . . . . . . . . . . . . . . .8
1.5.4 Internal View (B5102G21S2) . . . . . . . . . . . . . . . . . . . . . . .9
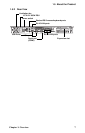
1.5.5 Motherboard Block Diagram. . . . . . . . . . . . . . . . . . . . . . .10
Chapter 2:Setting Up
2.1 Before You Begin . . . . . . . . . . . . . . . . . . . . . . . . . . . . . . . . . . . . .11
2.1.1 Work Area . . . . . . . . . . . . . . . . . . . . . . . . . . . . . . . . . . . . .11
2.1.2 Tools . . . . . . . . . . . . . . . . . . . . . . . . . . . . . . . . . . . . . . . . .11
2.1.3 Precautions. . . . . . . . . . . . . . . . . . . . . . . . . . . . . . . . . . . . .12
2.2 Rack Mounting . . . . . . . . . . . . . . . . . . . . . . . . . . . . . . . . . . . . . . .13
2.2.1 Installing the Server in a Rack. . . . . . . . . . . . . . . . . . . . . .13
2.3 Installing Motherboard Components. . . . . . . . . . . . . . . . . . . . . . .17
2.3.1 Removing the Chassis Cover. . . . . . . . . . . . . . . . . . . . . . .17
2.3.2 Installing a CPU, Heatsink and Air Duct. . . . . . . . . . . . . .18
2.3.3 Installing Memory . . . . . . . . . . . . . . . . . . . . . . . . . . . . . . .21
2.3.4 Installing a PCI Card . . . . . . . . . . . . . . . . . . . . . . . . . . . . .22
2.4 Installing a Hard Drive . . . . . . . . . . . . . . . . . . . . . . . . . . . . . . . . .26
2.4.1 Installing an External Access S-ATA Hard Disk Drive . .26
2.4.2 Installing an Internal IDE or S-ATA Hard Disk Drive . . .28
Chapter 3:Replacing Pre-Installed Components
3.1 Introduction. . . . . . . . . . . . . . . . . . . . . . . . . . . . . . . . . . . . . . . . . .31
3.1.1 Work Area . . . . . . . . . . . . . . . . . . . . . . . . . . . . . . . . . . . . .31
3.1.2 Tools . . . . . . . . . . . . . . . . . . . . . . . . . . . . . . . . . . . . . . . . .31
3.1.3 Precautions. . . . . . . . . . . . . . . . . . . . . . . . . . . . . . . . . . . . .32
3.2 Disassembly Flowchart. . . . . . . . . . . . . . . . . . . . . . . . . . . . . . . . .33
3.3 Removing the Cover . . . . . . . . . . . . . . . . . . . . . . . . . . . . . . . . . . .34
3.4 Replacing Motherboard Components . . . . . . . . . . . . . . . . . . . . . .35
3.4.1 Removing Add-On Components from the Motherboard. .35