


94
Index
Contents
94
Index
Contents
TESTING A PEN
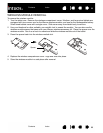
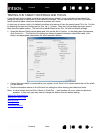
1. With the DIAGNOSTICS dialog box open, and while observing the POINTING DEVICE INFO column, bring
your Intuos5 tool within 10 mm (0.4 inch) of the tablet active area. A value for P
ROXIMITY, the DEVICE
N
AME, DEVICE TYPE, and a DEVICE S/N (serial number) should be displayed. If you have more than one
tablet connected to your system, be sure you have selected the T
ABLET for which you are testing your
tools from the T
ABLET INFO column.
2. Move your tool along the tablet surface. The X and Y D
ATA values should change to reflect the tool
position.
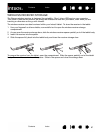
3. Test your pen switches. A tablet status LED should brighten each time you click with the tool tip, press
the side switch, or press the tool eraser to the tablet.
• Click on the tablet surface with the tool tip. The S
WITCHES state and PRESSURE value should change.
P
RESSURE should change from approximately 0% with no pressure applied to approximately 100%
when full pressure is applied.
• Next, press the side switch without pressing the tip to the tablet. The S
WITCHES state should
change. For the Intuos5 pen, do this for both positions of the side switch.
• Press the eraser to the tablet. The S
WITCHES state and PRESSURE value should change.
P
RESSURE should change from approximately 0% with no pressure applied to approximately 100%
when full pressure is applied.
• For the optional Airbrush, move the fingerwheel forward. The W
HEEL value should decrease to a
value of approximately 0 when the fingerwheel is all the way forward. Move the fingerwheel
backward. The W
HEEL value should increase to approximately 1000 when the fingerwheel is all the
way back.
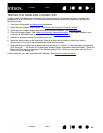
4. Test tilt for the x-axis by moving the pen from a vertical position toward the right; the X T
ILT value should
change from approximately 0 to +60. Now move the tool to the left of vertical; the X T
ILT value should
change from approximately 0 to -60.
5. Test tilt for the y-axis by moving the pen from a vertical position toward the bottom of the tablet; the Y
T
ILT value should change from approximately 0 to +60. Now move the tool toward the top of the tablet;
the Y T
ILT value should change from approximately 0 to -60.
6. For the optional Art Pen, test the rotation feature by placing the pen tip on the tablet surface and slowly
rotating the pen on its axis. The R
OTATION value should change as you rotate the pen.
7. When you are done, click on the C
LOSE button to exit the dialog box.
Pen
SWITCHES states
Tip = 1
Side switch (lower position) = 2
Side switch (upper position) = 3
Eraser = 1
Airbrush
SWITCHES states
Tip = 1
Side switch = 2
Eraser = 1