


IN-LINE STAPLER FINISHER USER GUIDE 5
Components
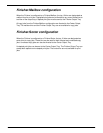
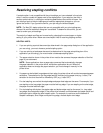
Figure 2: Finisher Components
1 Left Door - Open to clear jams in Areas 5 and 6.
2 Right Door - Open to clear jams in Areas 7 and 8. The top edge of the Right Door is
also used to grasp the Finisher when separating the Finisher from the copier/printer
for jam clearance.
3 Finisher Front Door - Open to access the stapler area for staple jams and staple
refills.
4 Finisher Mailbox/Sorter Bins - When the Finisher is configured as a Finisher/
Mailbox, printed jobs can be directed to any of the 10 mailboxes. When the Finisher is
configured as a Finisher/Sorter, up to 10 copied sets can be sorted to these bins. Each
bin holds a maximum of 100 sheets.
5 Center Output Tray (Top Tray) - Uncollated output from copy and print jobs will be
delivered to this tray. When the Finisher is unavailable, printed jobs will default to this
tray. The Center Output Tray holds a maximum of 300 sheets.
6 Finisher Output Tray - Stapled and unstapled print jobs will be offset in this tray. The
Finisher Output Tray holds a maximum of 1000 sheets. This capacity varies
depending on paper size.
7 Pause/Resume button - To ease unloading, press to pause output. Wait for the
machine to stop before unloading. This will ensure that your stapled sets are
complete. Press the button again to immediately resume printing or printing will
resume automatically after the one-minute timeout period.