


CLEARING PAPER MISFEEDS AND JAMS
XEROX DOCUPRINT 96/4635/180 NPS TROUBLESHOOTING GUIDE 5-5
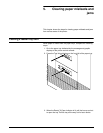
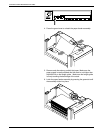
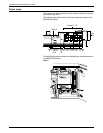
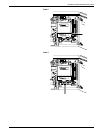
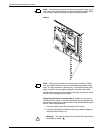
1. Go to the area of the printer indicated by the messages and
display on the printer control console.
2. Open any printer doors necessary to access the area.
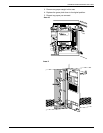
3. Clear the jammed paper from the area, following the
instructions on the Printer Controller message labels and the
messages on the printer control console. Refer to the section
“Printer areas” for more information.
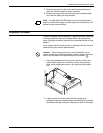
Note: You may find that the printer has already cleared the
paper jam area to the sample or purge trays.
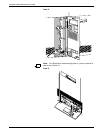
4. Close any printer doors that were opened.
5. Press the Continue button to resume printing.
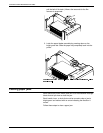
6. Discard any damaged sheets sent to the sample tray or purge
tray.
Note: You may find that the printer has already cleared the paper
jam area to the sample or purge trays.
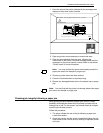
Checking job integrity following a paper jam
When printing resumes following a paper jam, there is a slight
possibility that duplicate sheets may be printed or sheets may be
missing from a job. For that reason, you should check job integrity
once the job has been printed.
Follow this procedure:
1. The printer offsets the rest of the job following a paper jam.
Locate that section.
2. Check this section and the sheets immediately before the first
offset sheet to see if there are any missing or duplicate sheets
in the job.
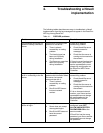
NOT READY
Fault Instructions
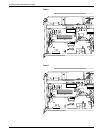
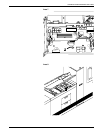
Clear any paper in areas 8, 15, 16, 17, and 18
Clear any paper in areas 8, 15, 16, 17, and 18
Clear
Follow the instructions on the labels 8,15,16,17,and 18 to clear paper from theses areas.