


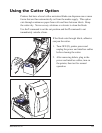

Replacing the TLP Print Head (Continued)
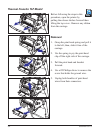
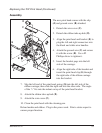
Assembly
The new print head comes with the clip
(
A
) and ground screw (
B
) attached.
1. Detach the wire cover (
C
).
2. Detach the ribbon take-up hub (
D
).
3. Align the print head and bracket (
E
) to
plug the left and right connectors into
the black and white wire bundles.
4. Attach the ground wire (
F
) and secure
it with the screw (
B
). Use a #2
Phillips driver to tighten it.
5. Insert the bracket pegs into the left
side of the carriage.
6. Align the right side of the bracket and
insert the print head clip (
A
) through
the right side of the ribbon carriage
into the bracket.
7. Slip the left end of the print head spring (
G
) into the left side of the
ribbon carriage; then slide the right end into the other side. The angle
of the "v" fits into the indent on top of the print head bracket.
8. Attach the ribbon take-up hub (
D
).
9. Attach the wire cover (
C
).
10. Clean the print head with the cleaning pen.
Reload media and ribbon. Plug in the power cord. Print a status report to
ensure proper function.
980485-001A 33
C
B
A
D
E
F
G