


8 CHAPTER 3: NETWORK SETTINGS
TCP/IP Protocol
Installation
This section describes how to install the TCP/IP protocol in computers running
Windows 95 and 98.
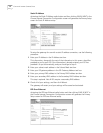
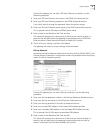
1 Click Start and choose Settings, and then Control Panel.
2 Double-click the Network icon and select Configuration.
3 Select Add to add the network component.
4 Double-click Protocol to add the TCP/IP protocol.
5 Select Microsoft from the manufacturer’s list. Select TCP/IP from Network
Protocols. Click OK to return to the Network window.
6 The installed TCP/IP protocol will be listed in the Network window. Click OK to
complete the install procedure and restart your computer.
Ping Command After configuring the TCP/IP settings, use the ping command to check if your
computer has successfully connected to this product. The following example
shows the ping procedure for Windows 95.
First, execute the ping command:
ping 192.168.123.254
If the following message appears,
Pinging 192.168.123.254 with 32 bytes of data:
Reply from 192.168.123.254: bytes=32 time=2ms TTL=64
a communication link between your computer and the gateway has been successfully
established.
However, if this message appears,
Pinging 192.168.123.254 with 32 bytes of data:
Request timed out.
there was a problem with the installation procedure. Check the following items:
■ Ethernet cable connections between the gateway and computer.
The corresponding port LED and the link LED of the network card installed in
your computer should be illuminated.
■ TCP/IP settings of the computer.
If the IP address of the gateway is 192.168.2.1, the IP address of the computer
must be 192.168.2.x (with x representing a number from 2through 100) and
the IP address of the default gateway must be 192.168.2.1.