


Rack-Mount Installation 13
If you are installing the switch in a free-standing stack with other 3Com
equipment, arrange the smaller units above the larger ones. Do not have
a free-standing stack of more than four units.
Placing Units On Top
of Each Other
If the switch units are free-standing, up to four units can be placed one
on top of the other. If you are mixing a variety of 3Com equipment, the
smaller units must be positioned at the top.
If you are placing switch units one on top of the other, you must use the
self-adhesive rubber pads supplied. Apply the pads to the underside of
each switch, sticking one in the marked area at each corner.
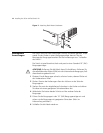
Rack-Mount
Installation
The switch is one rack-unit (1U, or 1.75 in.) high and will fit in a standard
19-inch equipment rack. The supplied mounting kit includes two
mounting brackets and four screws. When rack-mounting the unit, you
should take note of the guidelines given in
“Choosing a Suitable
Location” on page 11.
CAUTION: Disconnect all cables from the unit before continuing.
Remove the self-adhesive pads from the underside of unit, if already
fitted.
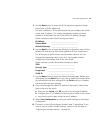
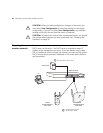
1 Place the unit on a hard, flat surface with the front facing towards you.
2 Position a mounting bracket over the mounting holes on one side of the
unit. Refer to
Figure 2 “Attaching Rack-Mount Hardware” on page 14.
3 Insert the screws supplied in the mounting kit and fully tighten with a
suitable screwdriver.
4 Repeat the two previous steps for the other side of the unit.
5 Insert the unit into the 19-inch rack and secure with suitable screws (not
provided).
6 Reconnect all cables.