


18 Connecting to the 3Com Unified Switch 24
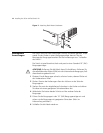
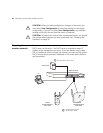
CAUTION: Do not connect any network cable to the Console port on the
switch. Connect only to the Ethernet ports.
3 Ensure that your computer is on the same subnet as the switch.
NOTE: The switch’s default IP address is 169.254.2.100.
a If your computer is using static IP addressing, ensure that its address is
within the same subnet as the switch, for example 169.254.2.200.
b If your computer is not using static IP addressing, Windows will
automatically assign an IP address in the correct subnet.
4 Start your Web browser and type the switch’s IP address into the address
bar: http://169.254.2.100.
Using the setup
wizard
The Unified Switch 24 can be configured through its web interface using
either the feature menu items, or by using the Setup Wizard. This section
describes how to use the Setup Wizard to quickly configure your switch
for basic Layer
2 and wireless networking. The wizard guides you through
configuring the system settings, IP settings, wireless settings, and saving
your changes. For complete configuration information, refer to the User
Guide.
1 If you have not done so already, access the switch’s Web user interface by
typing the switch’s IP address into the address bar of your Web browser:
http://169.254.2.100.
2 Log onto the switch by entering the user name and password and
clicking the Login button.
■ The default username is admin.
■ The default password is blank (no entry).
3 Launch the Setup Wizard by clicking the Wizard tab.
A welcome screen is displayed, showing the switch’s current
configuration. You will use the Next and Back buttons to navigate the
wizard and configure your switch.
4 Use the Next button to access the System Setup page. If you want to use
wireless, you must check Master Radio Enable and select the
appropriate Country Code. This setting is used to determine the
allowable radio channels for your access points. The System Name,
Location, and Contact are optional.