


9. Turn the heat/power switch to the OFF position, unless you are going to proceed
with threading and laminating. Unplug the machine.
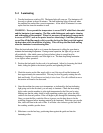
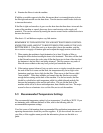
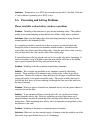
5-2 Threading the Laminator
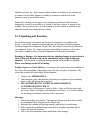
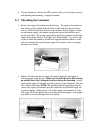
1. Remove the supply roll mandrels and the feed tray. The supply roll mandrels are
now ready to accept loading of the film rolls, wound with the polyester (shiny)
side out. When viewed from the front of the machine, the core grippers on both
top and bottom supply roll mandrels should point toward the heat shoes (and
toward each other). The tension control knobs should be positioned on the right.
Notice the knobs are labeled “Top Right” and “Bottom Right”. If you have rolls
of film on which the material is wound in the opposite direction (adhesive or dull
side out) exchange the top and bottom supply roll mandrels so the core gripper
positions are reversed.
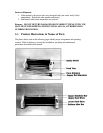
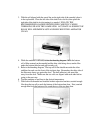
2. Slide a roll of film onto the top supply roll mandrel, turning the roll slightly to
slide the gripper inside the core. Make sure the dull side of the film is facing
up and the shiny side is facing the heat shoe during the threading. Scored
marks on the supply roll mandrels provide a guide for proper alignment of the two
rolls of film to each other. NOTE: The pointed metal piece protruding from the
center of the supply roll mandrels grips the cardboard core of the film supply roll
to prevent slippage. When placing a roll of film supply on the mandrel, twist the
film supply roll on the direction away from the point on the gripper, or the gripper
may break or become dislodged from its mounting.