


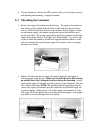
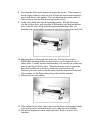


8. Now drape the film from the bottom roll against the top shoe. If the laminator is
hot, the exposed adhesive on the top web will hold the bottom web and make it
easy to stick the two rolls together. If you are threading the machine while it is
cold, use tape to stick the bottom web against the top web.
9. Tip the safety shield down into the laminating position. With the film draped
over the two heat shoes, push one edge of the threading card between the heat
shoes so that the film is firmly positioned against the laminating rollers. If a
threading card is not available, any piece of card stock or poster board will work.
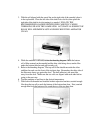
10. Make sure there is still enough slack in the web. Turn the drive switch to
FORWARD, permitting the film and feed board to pass through both sets of
rubber rollers. Carefully monitor initial threading to be sure the web reaches and
passes trough the pull (back) rollers. When the threading card has cleared the
back of the machine, move the drive switch to the center position (off).
Whenever you want to remove the film and/or laminated material from the back
of the machine, use the Zippy cutting toll provided with the laminator.
11. Slide the feed tray into position.
12. If the machine has the slitter option, make sure the slitters are disengaged (blades
in the raised position) and moved all the way to either side of the machine.
13. Film tension adjustments can be made at this time. Refer to section 5-4 for
instruction.