


5-4 Laminating
1. Turn the heat/power switch to ON. The heater light will come on. The laminator will
be ready to operate in about 10 minutes. The heat indicating light will turn off when
the machine has reached the correct temperature. Allow about 20 minutes for warm
up the first few times the machine is used.
WARNING: Never permit the temperature to exceed 310°° F while film is threaded
and the laminator is not running. The film could disintegrate and require cleaning
and rethreading of the machine. When it is necessary to laminate at temperatures
in excess of 310°° F, such as for poster board or when using 1.5 mil film, pull some
excess film off the film supply rolls to provide slack so the film is not tight against
the heat shoes while the machine is heating. This will keep the film from melting
when the laminator is not advancing film.
When the heat indicating light is on, it means the thermostat is calling for more heat to
maintain the laminating temperature. During normal operation, the light will go on and
off periodically. After initial warm-up (but not before), there is enough heat for
laminating to continue normally even if the light is on. The heat drop during lamination
is too slight to affect operation.
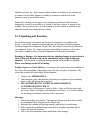
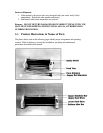
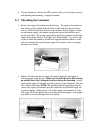
2. Position the feed guide for the work to be performed. Adjust by loosening the black
knob, sliding the guide to the desired position, and tightening the knob.
3. Check the tension on the film supply rolls to see if the top roll and the bottom roll
have approximately the same tension. This may be done by gently rotating the rolls
back and fourth. If a roll moves too freely it is too loose. If a roll is difficult to move
the tension will need to be decreased.
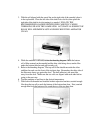
4. Once the machine has come up to temperature, as indicated by the heat indicating
light going out for the first time, you are ready to laminate. Check the heat setting
dial to make sure the machine is at the right temperature for the film you’re using.
Making sure that the safety shield is in the operating position (up), move the drive
switch to the forward position. Film will begin to pass through the laminating rollers.
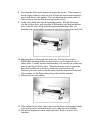
Once you start the film, watch the film as it passes over the heat shoes to let the
wrinkling disappear before inserting material to be laminated. Each time you stop the
film, slack will form in the web of film. It will take a few inches to get the slack and
the resulting wrinkles past the shoes.
5. Slide items over the feed tray, positioning them against the guide and into the
laminating rollers.