


6-1 Instructions for Options
NOTE: The footage counter and slitter cannot be installed together.
6-2 Footage Counter
Measures film usage in feet, also available in a metric version. To measure the use of film
with the footage counter:
• Set the wheel of the counter against the roll of film.
• Press the reset button located next to the digital read out.
• The counter will continue to measure the number of feet of film used
unless the wheel is lifted off the roll of film.
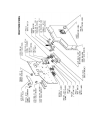
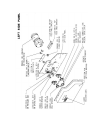
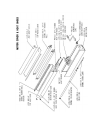
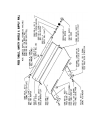
6-3 Slitters
The slitter allows you to quickly cut a laminated item, or group of items which maintain a
constant vertical arrangement. For example, a series of identically sized posters may be
cut as they exit the machine by positioning the blades on each side of the posters.
WARNING: The blades of the slitter are very sharp. Use extreme caution when
using this attachment. Always remove the blades when attaching or detaching the
slitter. Always retract the blades when they are not in use or when you are
adjusting their position.
Installation:
• Remove the cutting blades from the plastic blade holders. This is done to prevent
accidentally slicing the rubber rollers during installation of the slitter and for operator
safety.
• Turn the heat/power switch and the drive switch to the OFF position.
• Remove the top supply roll mandrel from the laminator.
• Locate the two accessory mounting holes on the inside of each housing. These are
located above the wrap around guard.
• Lower the slitter into position between the housings, blade holders toward the front of
the laminator.
• Fasten the slitter between the housings using the four screws provided.
• Slide the blade holders into the desired position by loosening the black plastic knobs.
• Replace the blades in the plastic blade holders with the knife edge facing the FRONT
of the machine.