


24
To apply remote user video compensation
1 On the remote user keyboard (connected to an Adder X100/X200 extender),
simultaneously, press the hotkeys (by default, and ) along with to
enter configuration mode.
The three keyboard indicators (‘Num Lock’, ‘Caps Lock’ and ‘Scroll Lock’)
will now begin to flash in sequence. The speed of the sequence indicates
the level of the sharpness adjustment currently
applied: the slower the rate, the lower the level of
sharpness being applied.
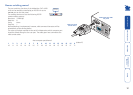
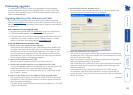
2 While viewing the displayed screen image, use the
following keys to adjust the controls:
Sharpness:
for fine adjustment,
for
coarse adjustment.
There are 255 sharpness levels (one coarse step jumps 10 levels).
To autoset sharpness (X100 modules only): Press
to make the module calculate and apply an automatic
compensation level - you can use this as a starting point for your
fine tuning.
Note: If the monitor goes blank and switches off (due to oversetting
the sharpness adjustment) press the Home key to restore.
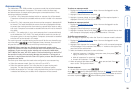
Brightness:
for adjustment. There are 255 brightness levels.
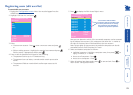
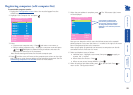
Sharpness
increase
(coarse)
Sharpness
decrease
(coarse)
Sharpness
increase
(fine)
Sharpness
decrease
(fine)
Brightness
increase
Brightness
decrease
Restore default
sharpness and
brightness
settings
Exit image
controls
and save
settings
3 When no shadows are visible and the displayed images have crisp edges,
press to exit configuration mode and permanently save all settings.
The new compensation settings will be stored, even when power is removed
or if a complete reset is initiated. These settings should not require further
changes unless the cabling arrangements are altered.
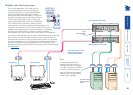
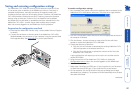
Remote user skew adjustment
The category 5, 5e and 6 cabling supported by the AdderView CATx 1000 consists
of four pairs of wires per cable. Three of these pairs are used to convey red, green
and blue video signals to the remote video monitor. Due to the slight difference
in twist rate between these three pairs, the
red, green and blue video signals may not
arrive at precisely the same time. This is
visible as separate colour shadows on high
contrast screen images and is particularly
apparent when using higher screen
resolutions and some types of category 5e
cables.
To alleviate this situation, the Adder
X100AS/R and X200AS/R modules provide
internal skew adjustment that can help to
rectify the situation. The skew adjustment
works by delaying or advancing the timing
of any of the red, green or blue colour
signals so that they are all delivered to
the monitor at precisely the same time. For best results, the “skew” program
supplied on the disk or downloadable from www.adder.com or www.adder.
info is the most accurate way of setting skew as the red, green and blue lines
are rendered exactly on the screen as single pixel wide lines. The skew.bmp test
pattern can also be used but it is less accurate. Alternatively, you can create your
own skew pattern using a standard image creation package, as detailed on the
next page.
continued
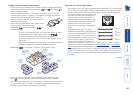
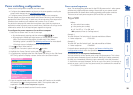
1 2 3 4 56 7 8
8
6
5
2
8
6
5
2
Data signal
Red
video signal
Green
video signal
Blue
video signal
7
3
4
1
7
3
4
1