


AdderView Installation and Use Page 10
2.2 Mounting the AdderView
The AdderView has been designed to be used either on a desktop or mounted in a
19 inch rack. If the AdderView is to be used on a desktop then you will need to stick
the supplied self-adhesive rubber feet to the underside of the AdderView. If the
AdderView is to be mounted in a 19 inch rack then you will need to fit the rack
mounting brackets to the side of the AdderView. The 19 inch rack mounting brackets
are supplied in the option rack mounting kit (part code: AVrmk)
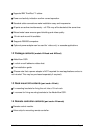
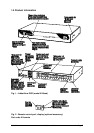
2.3 Connecting your devices
Ensure that the optional power adapter is disconnected from the AdderView and that
all the devices which are to be attached are switch off. Connect the shared
keyboard, PS/2 mouse and monitor to the connectors at the rear of the AdderView
(see figs 1, 2 and 3). Connect your keyboard monitor and mouse to the control port.
Next connect each computer system unit in turn with the keyboard cable, mouse
cable and video cable. Any unused computer connections can be left unconnected.
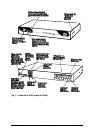
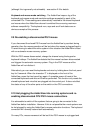
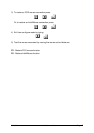
To connect computers with serial mouse connections and AT style keyboard
connections use the adapters supplied in the cabling pack as shown below.
Alternatively, if you have chosen not to purchase the cable pack, refer to appendix A
for cable specifications.
The AdderView is now ready for use and will start to operate as soon as one of the
attached PCs is powered on. If you are connecting to PCs using cables that are
longer than 3 metres or are cascading the AdderView to another AdderView you will
need to use the optional power adapter. When using the optional power adapter,
ensure that it is connected to the mains and powering the AdderView before you
switch on the connected computers. Failure to switch the AdderView and computers
on in the correct order can lead to the mouse and/or keyboard not being recognised