


20
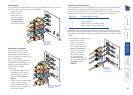
Image controls - sharpness and brightness (continued)
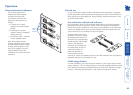
To use the image controls
1 Simultaneously, press the hotkeys (by default,
and ) along with to enter conguration
mode.
The three keyboard indicators (‘Num Lock’, ‘Caps
Lock’ and ‘Scroll Lock’) will now begin to ash in
sequence. The speed of the sequence indicates the
level of the sharpness adjustment currently applied: the slower the rate, the
lower the level of sharpness being applied.
2 [OPTIONAL STEP] By default, your sharpness and brightness adjustments are
applied equally to all of the video channels. However, if required, you can
select individual channels and adjust them separately.
To select video channels: Using the numeric keys of the main keyboard (not
the keypad keys), press the number of the video channel to adjust. When a
numeric key is pressed, all three of the keyboard indicators will illuminate for
a moment before continuing with their ashing sequence.
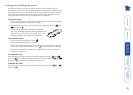
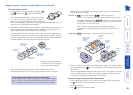
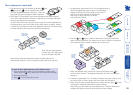
3 While viewing the displayed high contrast screen image, use the following
keys to adjust the controls:
Sharpness:
for ne adjustment,
for coarse adjustment.
There are 255 sharpness levels (one coarse step jumps 10 levels).
To autoset sharpness: Press
to make the module calculate
and apply an automatic compensation level - you can use this as a
starting point for your ne tuning.
Note: If the monitor goes blank and switches off (due to
oversetting the sharpness adjustment) press the Home key to
restore.
Brightness:
for adjustment. There are 255 brightness levels.
Sharpness
increase
(coarse)
Sharpness
decrease
(coarse)
Sharpness
increase
(ne)
Sharpness
decrease
(ne)
Brightness
increase
Brightness
decrease
Restore default
sharpness and
brightness
settings
Exit image
controls
and save
settings
4 When no shadows are visible and the displayed images on all video channels
have crisp edges, press to exit conguration mode and permanently save
all settings.
The new compensation settings will be stored, even when power is removed
or if a complete reset is initiated. These settings should not require further
changes unless the cabling arrangements are altered.
To reset all image controls to their default states
1 Enter conguration mode (if you are already in image control mode, press
the key to ensure that all channels are selected).
2 Press the Home key
3 Press to exit conguration mode.
Re-select all
channels
Select video
channel 1
Select video
channel 3 (MS4
model only)
Select video
channel 2
Select video
channel 4 (MS4
model only)
Note: Use the main keyboard
numeric keys, NOT the keypad
keys on the right hand side.
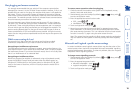
If the image controls cannot provide a crisp image
If, after adjusting the image controls, one or more screen images
remain fuzzy or have coloured shadows you may need to use the
Skew adjustment feature. Please see the next section for details.
Note: When entering conguration mode, all video channels are
automatically selected. You can change the video channel at any time.