


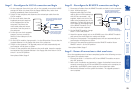


26
Further information
Troubleshooting
If you experience problems when installing or using the X2 Multi Screen
modules, please check through this section for a possible solution. If your
problem is not listed here and you cannot resolve the issue, then please refer to
the ‘Getting assistance’ section.
Video image at the REMOTE module is distorted or shadows appear to
the right of displayed objects.
Adjustments are required to compensate for the length of the twisted pair cable
being used. If video problems persist:
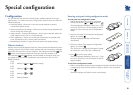
• Please refer to the ‘Image controls - sharpness and brightness’ section in the
‘Special Conguration’ chapter.
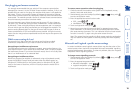
• If the overall video image is ‘fuzzy’ and/or has coloured shadows you may
need to make skew adjustments. This procedure allows you to nely tune
the red, green and blue video signal timings to overcome most colour
separation problems. Please refer to the ‘Skew adjustment’ section in the
‘Special Conguration’ chapter.
No video image is received at the REMOTE module.
• Check that the power/activity indicators are lit on the LOCAL and REMOTE
modules - if they are not, then there is a power problem. The MS2 LOCAL
module gains its power either from the computer’s keyboard socket or by
using an optional power adapter. The MS4 LOCAL module requires power
from its supplied power adapter.
When keys are pressed or the mouse is moved, check that the indicators
icker – if they do not respond then there could be a twisted pair link
problem or a problem with one of the modules.
• Check that multiple link cables are correctly connected only between the
corresponding ports on the LOCAL and REMOTE modules and do not cross
over to other ports.
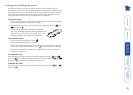
• Check that each link cable is wired correctly as per the diagram in the ‘Skew
adjustment’ section in the ‘Special Conguration’ chapter.
• If possible, try using an alternative twisted pair link connection between the
modules. Ensure that all of the link cables are of the same length and have
the same twist characteristics - it is not possible to adjust only one video
channel, they are all adjusted together.
• If the sharpness control is set too high, the monitor may not be able to
display a picture. Try reinstating the factory default sharpness settings.
Please refer to the ‘Image controls - sharpness and brightness’ section in the
‘Special Conguration’ chapter.
• Temporarily disconnect the video link to the LOCAL module, connect a
monitor directly to the computer video port and check for a correct video
image output.
The keyboard indicators are ashing between the Caps Lock and the
Num Lock/Scroll Lock and the computer does not respond to any key-
board or mouse inputs.
• The modules are currently locked and require a valid password to be
entered. Please refer to the section ‘Locking and unlocking the system’ for
details.
Power is applied via the power supply but the REMOTE module opera-
tion has stopped.
• Each module has an internal automatic cut-out fuse to protect against
power surges. To reset, remove power from the module for one second and
then reconnect.
The on-screen mouse pointer does not respond to mouse movements
• The mouse connection may have been interrupted. Either, reboot the
system and re-power the REMOTE module power supply, or try using the
mouse restoration command. Please refer to the ‘Hot plugging and mouse
restoration’ section in the ‘Special Conguration’ chapter.
Sound from the microphone cannot be heard or is very quiet
• Check the setting of LOCAL switch 3 - if a microphone is connected at the
REMOTE module, the switch should be set OFF.
Sound input from the stereo line input is distorted (‘tinny’ sounding) and
only one channel is working
• Check the setting of LOCAL switch 3 - if a stereo line input is connected at
the REMOTE module, the switch should be set ON.
SECT 5