


American DJ® - www.americandj.com - Accu Roller 250™ Instruction Manual Page 18American DJ® - www.americandj.com - Accu Roller 250™ Instruction Manual Page 17
Accu Roller 250™ System Menu
On-Board System Menu.
The Accu Roller 250™ comes with an
easy to navigate system menu. This next section will detail the func-
tions of each command in the system menu.
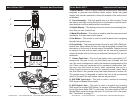
Enter Button -
To access the main menu locate the ENTER button (6)
on the front of the unit. Press this button to activate the system menu.
Tap the UP button (4) until you reach function you wish to change.
When you reach the function you wish to change tap the
ENTER button.
When a function is selected the menu will begin to flash, use the UP
button to change the function. Once your changes are made tap the
ENTER button again to lock the change in the system, if the ENTER
button is not selected within eight seconds the system will automati-
cally return to menu section. To exit without making any changes tap
the MODE/ESC button (3).
Accu Roller 250™ System Menu
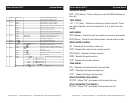
DISPLAY MENU -
VALU (DMX-512 Value) - Display the DMX-512 value of each
channel.
D ON (Display On) - Turns digital display on and off.
FLIP - “Flips” the digital display 180º.
SPEC MENU -
RDMX - On/Off With this function you are able to change the
DMX address via external controller. See pages 25-26.
SPOT - This provides a spot beam for better lamp optimization.
DFSE - This will reset the unit to the default settings.
VER (Version) - Software version 2.2
EDIT MENU -
STEP (Step) - Steps to be used in Edit Programming. See ediit
program. See page 28.
SCO1 - SC48 (Scene 01 - Scene 48) - These are the scene slots
that you write your programs into. See edit program, pages 28
- 31.
TIME (Time) - Time for each scene. See pages 28 - 31.
CEDT - Edit program using a external controller. See pages 28
- 31.
C-01 - C-30 (Channel 1 - Channel 30) - The channels of each
scene that can be edited. See pages 28 - 31.
ADDR MENU -
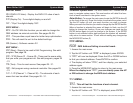
ADDR DMX Address Setting via control board -
1. Access the main menu.
2. Tap the UP button until “ADDR” is displayed, press ENTER.
3. “A001” will now be displayed. Press the UP or DOWN buttons
to find your desired address. Press ENTER to confirm.
4. The display will show “PASS”, and then display, your selected
address again.
5. Press the MODE/ESC button to return to the main menu.
When the display is on “A001”, you can directly press the UP
or DN buttons to change the DMX start address.
TEST MENU -
TEST - This will test the functions of each channel.
1. Access the main menu.
2. Tap the UP button until “TEST” is displayed, press ENTER.