


is assuming he is accessing those sites with the system he
enrolled his OmniPass user onto. OmniPass does not actually
change the credentials of the password protected resource. If
he were to go to an Internet café to access his webmail, he
would need to enter his original webmail credentials ("Ikari"
and "warriors") to gain access. If he attempts his OmniPass
user credentials ("Eva_01" and "eschaton") on a system other
than where he enrolled that OmniPass user, he will not gain
access.
Continue to the next section to begin OmniPass user enrollment.
2.2 Basic Enrollment
The basic enrollment procedure assumes you have no hardware
authentication devices or alternate storage locations that you
wish to integrate with OmniPass. If you desire such
functionality, consult the appropriate sections after reviewing
this section.
The OmniPass Enrollment Wizard will guide you through the
process of enrolling an OmniPass user. Unless you specified
otherwise, after OmniPass installation the OmniPass Enrollment
Wizard will launch on Windows login. If you do not see the
OmniPass Enrollment Wizard, you can bring it up by clicking
Start on the Windows taskbar; select Programs; select Softex;
click OmniPass Enrollment Wizard.
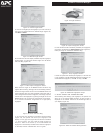
2.2.1 Click Enroll to proceed to username and password
verification. By default, the OmniPass Enrollment Wizard
enters the credentials of the currently logged in Windows
user.
2.2.2 Enter the password you use to log in to Windows. This
will become the "master password" for this OmniPass
user. In most cases, the Domain: value will be your
Windows computer name. In a corporate environment,
or when accessing corporate resources, the Domain:
may not be your Windows computer name. Click Next
to continue.
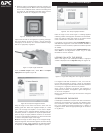
2.2.3 In this step you are selecting where OmniPass will be
securely storing your OmniPass data. Do not be alarmed
if there are devices listed as selections that you do not
have or that you have not installed on your system.
The selections displayed on this screen are dependent
upon the version of OmniPass you have installed. These
selections are not necessarily dependent upon which
devices are attached to your system. Although, if an
applicable device (e.g. SmartCard, USB key) is installed
but not attached to your system, it may not be visible
as a selection. Regardless of where you choose to store
OmniPass data, the data are stored in an encrypted
format and their content will not be viewable to others.
If you would like to use a secure storage device other
than Local Hard Disk Drive then please review Chapter 2.4
Alternate Storage Location to see how your enrollment
procedure will differ. Otherwise click Local Hard Disk Drive
and click Next to proceed.
2.2.4 In this step you can select which authentication devices
you would like to integrate with OmniPass. Just as in
the secure storage device selection screen, there may be
devices listed that are not present on your system. Also,
installed devices that are not attached may not appear
on this screen. If you would like to enroll an
authentication device then please review Chapter 2.3
Enrolling an Authentication Device (Optional) to see how
your user enrollment procedure will differ. If you do
not want to enroll any authentication devices right now
then do not select any, and click Next to proceed. You
will be prompted to confirm that you are not enrolling
any authentication devices.
2.2.5 In this step you can choose how OmniPass notifies you
of various OmniPass events. We recommend you keep
Taskbar Tips on Beginner mode taskbar tips and Audio Tips on
at least Prompt with system beeps only until you get
Biometric Password Managers
accustomed to how OmniPass operates. Click Next to
proceed with user enrollment. You will then see a
Congratulations screen indicating your completion of
user enrollment. You should heed the warning stated.
2.2.6 WARNING: If you will use OmniPass to encrypt and
decrypt files, we STRONGLY recommend exporting your
user profile to a backup media such as a floppy disk. In
case your system is corrupted, this backup will be
required to be able to access your encrypted files.
The export user profile function will be described in
Chapter 5. Exporting and Importing Users. Click Done
to exit the OmniPass Enrollment Wizard. You will be
asked if you would like to log in to OmniPass with your
newly enrolled user; click Yes and then proceed to Part
2 to start using OmniPass.
2.3 Enrolling an Authentication Device (Optional)
Integrating a hardware authentication device will both, increase
the security of your OmniPass system, and streamline the
OmniPass authentication procedure. Security is enhanced in
that if your "master password" becomes compromised, you
can restrict access to OmniPass (and the sites remembered) via
a hardware security device. You can configure OmniPass to
restrict access entirely via the authentication device. When
decrypting files or visiting remembered websites, instead of
manually typing your "master password" each time, you could
authenticate with the security device (e.g. use your fingerprint).
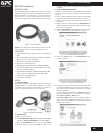
You can enroll devices manually in the OmniPass Control Center.
With an OmniPass user logged in, double-click the system tray
OmniPass icon. Select the User Settings tab and click Enrollment
under the User Settings area. Click Enroll Authentication Device and
authenticate at the OmniPass authentication prompt to start
device enrollment.
2.3.1 Enrolling a Fingerprint Recognition Device During initial user
enrollment, at Select Authentication Device select the
security device which you want to enroll and click Next.
2.3.1.1 Choosing a Finger You will be prompted to select the
finger you wish to enroll. Fingers that have already
been enrolled will be marked by a green check. The
finger you select to enroll at this time will be marked by
a red arrow. OmniPass will allow you re-enroll a finger.
If you choose a finger that has already been enrolled and
continue enrollment, OmniPass will enroll the fingerprint,
overwriting the old fingerprint. Select a finger to enroll
and click Next.
2.3.1.2 Capturing the Fingerprint It is now time for OmniPass to
capture your selected fingerprint. It may take up to
eight captures before OmniPass can acquire your
fingerprint. Should OmniPass fail to acquire your
fingerprint, or if the fingerprint capture screen times
out, you can click Back to restart the fingerprint
enrollment process. There are several types of fingerprint
sensors (e.g. "swipe" or "touchpad"), and each type
requires a different action for capturing. The "core" of
the fingerprint is the ideal area for capture. The core of
your fingerprint is usually aligned with the base of your
cuticle. It is where the concentric whorls of your
fingerprint converge. To start fingerprint capturing,
follow the directions on the Capture Fingerprint screen.
Touchpad sensors are square, and they require you to
place your fingertip on the sensor and hold it there until
it is captured. During a successful fingerprint capture
the text, Place the selected finger on the sensor, will be
replaced with the text, Lift and replace your finger on the
sensor. You will also see a black fingerprint in the capture
window turn and stay green, and the counter under the
capture window will increment. Lift and replace your
fingertip as many times necessary for OmniPass to
acquire your fingerprint.
M.13