


This .opi file contains all your user specific OmniPass data, and
it is both encrypted and password protected. This user profile
does NOT contain any of your encrypted data files.
5.2 Importing an OmniPass User Profile
NOTE: You cannot import a user into OmniPass if there already
is a user with the same name enrolled in OmniPass.
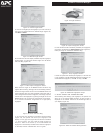
To import an OmniPass user open the OmniPass Control Center,
and click Import/Export User under Manage Users. Click Imports a
new user into OmniPass and you will be directed to select the
storage device from which to import the user profile.
If you did not enroll any alternate secure storage devices, then
select OmniPass Import/Export File (*.opi) and click Next. OmniPass
will then prompt you to browse for the file you had previously
exported (.opi file). When you select the .opi file for importation,
OmniPass will prompt you for authentication. The credentials
that will allow a user profile to be imported are the Windows
login credentials of the exported user. They are the credentials
that had to be submitted when the user profile was exported.
You will need User Name, Password, and Domain. If you don't
remember the value for Domain, in a corporate environment
your network administrator should know, and in a PC or SOHO
environment Domain should be your computername.
Once authentication is successful, OmniPass will prompt you
to select a storage device for this users OmniPass data.
Unless you have an alternate secure storage device installed
(USB key, SmartCard, etc.) select Local Hard Disk Drive and click
Next. OmniPass will
5.3 Things to Know Regarding Import/Export
Assume you export a local Windows User profile from
OmniPass. You want to import that profile to another
machine that has OmniPass. Before you can import the
profile, a Windows user with the same login credentials must
be created on the machine importing the profile.
Example - I have a Windows user with the username
"Kasahara" and the password "Motorcycle" on my system. I
have enrolled Kasahara into OmniPass and remembered
passwords. I want to take all my passwords to new system.
I export Kasahara's OmniPass user profile. I go to my new
system and using the Control Panel I create a user with the
username "Kasahara" and the password "Motorcycle". I can
now successfully import the OmniPass user data to the new
system.
When you export from OmniPass a Windows domain user,
you can import that OmniPass user profile on any domain
computer running OmniPass.
Example - Balthasar and Melchior are computers on the
"NERV" domain. I work on Balthasar with the username
"Ikari" and the password "PenPen" on the NERV domain. I
have enrolled this user, Ikari, in OmniPass and remembered
passwords. I want to take all my passwords to Melchior. I
export Ikari's user profile from OmniPass on Balthasar. I go
to OmniPass on Melchior and import Ikari's OmniPass data.
Since Balthasar and Melchior are on the same domain, the
import is successful. If you do not know the domain you are
using, you should contact your network administrator for
assistance.
If you export an OmniPass-only user, you can import that
user to any computer running OmniPass, provided that a
user with that name is not already enrolled in OmniPass.
If you attempt to import a user profile who has the same
name as a user already enrolled in OmniPass, the OmniPass
import function will fail.
Chapter 6. Overview of the OmniPass
Control Center
Most of the functionality within the OmniPass Control Center
has been touched upon in the previous two parts (Start and
Use). This chapter will serve to explain functions within the
OmniPass Control Center that weren't explained thoroughly
in the preceding parts of this users' guide. The Vault
Management tab was exhaustively outlined in Chapter 3.4 -
3.6 and will not be covered in this chapter.
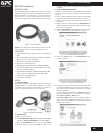
You can access the OmniPass Control Center any of three
ways:
• Double-click the golden OmniPass key shaped icon in the
Windows taskbar (typically in the lower-right corner of the
desktop)
• Click the Start button; select the Programs group; select the
Softex program group; and click the OmniPass Control Center
selection.
• Open the Windows Control Panel (accessible via Start button -
-> Settings --> Control Panel) and double-click the Softex
OmniPass icon.
6.1 User Management
The User Management tab has two major interfaces: Add/Remove
User and Import/Export User. Import/Export User functionality is
well documented in Chapter 5. Add/Remove User functionality
is straightforward. If you click Adds a new user to OmniPass you
will start the OmniPass Enrollment Wizard. The Enrollment
Wizard is well documented in Chapter 2. If you click Removes a
user from OmniPass, OmniPass will prompt you to authenticate.
Authenticate with the credentials (or enrolled fingerprint) of
the user you wish to remove. OmniPass will prompt you to
confirm user removal. Click OK to complete user removal.
WARNING: Removing a user will automatically destroy all
OmniPass data associated with that user. All identities and
remembered credentials associated with the user will be lost.
Any remaining files encrypted by the user will be impossible to
decrypt.
If you are sure about removing the user, we recommend you
1. Decrypt all OmniPass encrypted files before removing the
user
2. Export the user profile
6.2 User Settings
The User Settings tab has four interfaces: Audio Settings, Taskbar
Tips, Encrypt/Decrypt, and Enrollment. User settings allow users
to customize OmniPass to suit their individual preferences.
Under User Settings (Audio Settings and Taskbar Tips) you can set
how OmniPass notifies the user of OmniPass events (e.g.
successful login, access denied, etc.). The details of each setting
under the Audio Settings and Taskbar Tips interfaces are self-
explanatory.
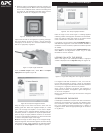
The Encrypt/Decrypt interface under User Settings allows you to
choose either the Softex Roaming Profile or a Digital Certificate
that is already installed on your system. If you choose Softex
Roaming Profile then the keys used for encryption are part of
your OmniPass User Profile. Portability of OmniPass encryption
functions to other computers require only your OmniPass
User Profile. If you choose Digital Certificate then the keys
used for encryption are separate from your OmniPass User
Profile. Portability of OmniPass encryption functions will require
migration of both your OmniPass User Profile and the installed
Digital Certificate. NOTE: Do not remove this Digital Certifcate.
If it is removed from the system, you will not be able to
recover any of the encrypted files!
Within the Encrypt/Decrypt section you can also configure both
the encryption algorithm and the key length (in bits). Changes
you make to these settings are only applied to future
encryptions. So if you already had files encrypted when you
change the encryption settings, you will need to decrypt and
re-encrypt those files to have your encryption settings apply
to them. Decryptions using original encryption settings are
handled transparently to the user.
The Enrollment interface allows you to enroll authentication
devices, enroll fingerprints, and set authentication rules for
enrolled devices. For the procedure to enroll and authentication
device refer to Chapter 2.3. To enroll additional fingerprints,
M.18
Biometric Password Managers