


ASUS P5VD2-MX/P5V-VM DH 3-17
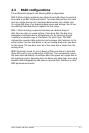
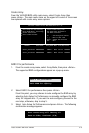
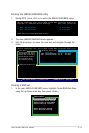
Deleting a RAID set
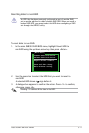
1. In the main JMB363 RAID BIOS menu, highlight Delete RAID Disk Drive
using the up/down arrow key then press <Enter>.
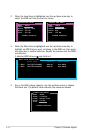
2. Use the space bar to select the RAID set you want to delete.
A selected set shows a
sign before it. Press the <Del> key to
delete the set.
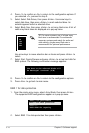
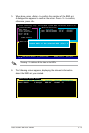
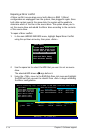
3. A dialogue box appears to conrm the action. Press <Y> to conrm;
otherwise, press <N>.
Pressing <Y> deletes all the data in the HDDs.
[Main Menu]
Create RAID Disk Drive
Delete RAID Disk Drive
Revert HDD to Non-RAID
RepairMirrorConict
Save and Exit Setup
Exit Without Saving
JMicron Technology Corp. PCI-to-SATA II/IDE RAID Controller BIOS v0.97
[Hard Disk Drive List]
Model Name Capacity Type/Status
HDD0: HDS722516VLSA80 164 GB RAID Inside
HDD1: HDS722516DLA380 164 GB RAID Inside
[RAID Disk Drive List]
Model Name RAID Level Capacity Status Members(HDDx)
RDD0: JRAID 0-Stripe XXX GB Normal 01
[Main Menu]
Create RAID Disk Drive
Delete RAID Disk Drive
Revert HDD to Non-RAID
RepairMirrorConict
Save and Exit Setup
Exit Without Saving
ALL DATA ON THE RAID WILL BE LOST!!
ARE YOU SURE TO DELETE (Y/N)? Y
[
TAB]-Switch Window [↑↓]-Select Item [ENTER]-Action [ESC]-Exit
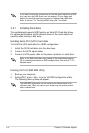
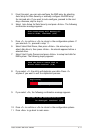
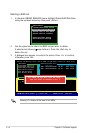
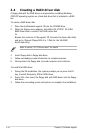
Resetting disks to non-RAID
To reset disks to non-RAID:
1. In the main JMB363 RAID BIOS menu, highlight Revert HDD to
non-RAID using the up/down arrow key then press <Enter>.
2. Use the space bar to select the HDD that you want to reset to
non-RAID.
A selected HDD shows a
sign before it.
3. A dialogue box appears to conrm the action. Press <Y> to conrm;
otherwise, press <N>.
[Main Menu]
Create RAID Disk Drive
Delete RAID Disk Drive
Revert HDD to Non-RAID
RepairMirrorConict
Save and Exit Setup
Exit Without Saving
Pressing <Y> deletes all the data in the HDD.
An HDD that has been previously congured as part of another RAID
set in another platform is called a broken RAID HDD. When you install a
broken RAID HDD, you cannot select this HDD when conguring a RAID
set through the JMB363 utility.