


2-82-8
2-82-8
2-8
Chapter 2: Basic installationChapter 2: Basic installation
Chapter 2: Basic installationChapter 2: Basic installation
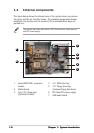
Chapter 2: Basic installation
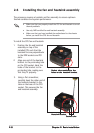
2.6 Installing the fan and heatsink assembly
The processor requires a heatsink and fan assembly to ensure optimum
thermal condition and system performance.
• Make sure that you properly install the CPU fan and heatsink to avoid
thermal problems.
• Use only AMD-certified fan and heatsink assembly.
• Make sure that you have installed the motherboard to the chassis
before you install the CPU fan and heatsink.
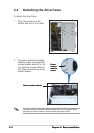
To install the CPU fan and heatsink:
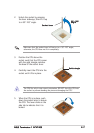
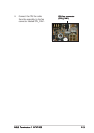
1. Position the fan and heatsink
assembly on top of the
installed CPU such that the
heatsink fins are perpendicular
to the DDR sockets and PCI
slots.
2. Align one end of the heatsink
bracket to the protruding tabs
on the CPU socket. Hook the
holes of the bracket to the
protruding tabs, making sure
that they fit properly.
Socket tabsSocket tabs
Socket tabsSocket tabs
Socket tabs
Heatsink bracketHeatsink bracket
Heatsink bracketHeatsink bracket
Heatsink bracket
Socket tabs matched to theSocket tabs matched to the
Socket tabs matched to theSocket tabs matched to the
Socket tabs matched to the
holes on the heatsink bracketholes on the heatsink bracket
holes on the heatsink bracketholes on the heatsink bracket
holes on the heatsink bracket
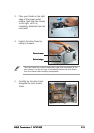
3. Using a flat screwdriver,
carefully hook the other end of
the heatsink bracket to the
tabs on the base of the CPU
socket. This secures the fan
and heatsink assembly.