


29
ATTO Technology Inc. iPBridge Installation and Operation Manual
not showing up, contact your service
representative.
5 If all devices appear, invoke the ScsiTargets
command several times on each SCSI port to
verify that the devices can be seen. If devices
disappear then appear again, the problem is
most likely a SCSI cable. For information on the
ScsiTargets command, refer to SCSI
configuration commands on page 47.
If all devices appear and remain, move to the
iPBridge internal configuration section.
When changing any setting on the iPBridge the
configuration must be saved by using either the
saveConfiguration CLI command or through the
ATTO ExpressNAV interface.
Checking the serial port
1 Verify you have the correct settings and that
your terminal is configured to:
• Baud rate: 115200
• Data bits: 8
• Stop bits: 1
• Parity: off
• Flow control: None
2 Verify that your serial cable is less then two
meters in length.
Checking the iPBridge internal
configuration
Verify that the SCSI devices are mapped properly.
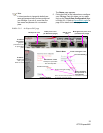
Check in the ATTO ExpressNAV interface or use the
routedisplay iSCSI
command to show mappings. If
devices do not appear, power down the iPBridge and
power back on. Refer to
Mapping devices: NDMP
on
page 13,
Mapping devices: iSCSI
on page 15 and
Mapping commands
on page 57.
When changing any setting on the iPBridge, the
configuration must be saved by using either the
saveConfiguration
CLI command or through the
ATTO ExpressNAV interface.
Checking iPBridge Ethernet ports
1 Check Ethernet cable integrity. Check the
cables for solid connections. Cat5 cable can
cause connection issues with Gigabit Ethernet.
Cat6 cable is the best cabling for the iPBridge.
2 Verify the IP address, subnet mask, and
gateway are properly set on each data port on
the iPBridge for your network environment.
Refer to Getting an IP address
on page 10.
3 Verify that the Ethernet speed is set to auto:
invoke the get EthernetSpeed all command,
check the Ethernet page of the ATTO
ExpressNAV interface, or check the LED link
lights to determine if the Ethernet speed is
correct.
4 Determine if the iPBridge is set to get its IP
information from a DHCP server. If so, verify
that the DHCP server has available IP
addresses. Refer to Getting an IP address
on
page 10.
5 Verify that each used Ethernet port on the
iPBridge can be pinged from the desired host.
Refer to Ping
on page 52.
If the host cannot ping the iPBridge ports and
the iPBridge ports are properly configured,
continue to the Local Area Network/Wide Area
Network section, Checking the LAN/WAN
on
page 29.
Verify that each port on the iPBridge can ping
each desired host. Refer to Ping
on page 52. If
the iPBridge cannot ping the host, continue to
Checking the LAN/WAN
on page 29.
6 If using DHCP, verify that the DHCP server is
assigning the correct IP information to the host.
7 Some older switches/hosts cannot auto
negotiate between the iPBridge and the
switch/host at the desired speed. You may
have to force the host/switch or the iPBridge to
the desired speed.
8 Verify that the host is logging into the iPBridge
correctly by viewing the Connections page
and determining if there a “session open”
status.
9 Verify that you are using the correct log in
procedure for your initiator. For example: When
connecting using the Adaptec initiator, the log
on screen requests the iPBridge iqn (iSCSI
qualified name). If left blank, Adaptec cannot
log in. Enter “iSCSI” into this field for auto iqn
discovery.
When changing any setting on the iPBridge the
configuration must be saved by using either the
saveConfiguration
CLI command or through the
ATTO ExpressNAV interface.
Checking the LAN/WAN
1 Verify that the switch/switches are segmented
properly so that hosts and the iPBridge have
access to each other.