Chapter 2: Installation 7
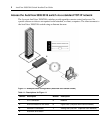
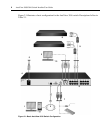
1. Plug your monitor and either PS/2 or USB keyboard and mouse cables into the appropriately
labeled ports on the AutoView switch.
2. Plug a compatible IQ or IAC module into the appropriate ports on the back of the target server.
3. Choose an available numbered port on the rear of your AutoView 3008/3016 switch. Plug the
IAC cable or one end of a UTP patch cable (4-pair, up to 45 meters) into the selected port and
plug the other end into the RJ-45 connector of the IQ module. Repeat this procedure for all
servers that are to be connected to the AutoView 3008/3016 switch.
NOTE: When connecting a Sun IQ module, you must use a multi-sync monitor in the local port to accommodate
Sun computers that support VGA or composite sync.
4. Plug a UTP patch cable from your Ethernet network into the LAN port on the back of your
AutoView 3008/3016 switch. Network users will access the AutoView 3008/3016 switch
through this port.
5. Locate the power cord that came with the AutoView 3008/3016 switch and plug the
appropriate end into the power socket on the rear of the switch. Plug the other end into an
appropriate AC wall outlet.
NOTE: To avoid potential video and/or keyboard problems when using Avocent products: If the building
has 3-phase AC power, ensure that the computer and monitor are on the same phase. For best results, they
should be on the same circuit.
WARNING: To reduce the risk of electric shock or damage to your equipment:
- Do not disable the power cord grounding plug. The grounding plug is an important safety feature.
- Plug the power cord into a grounded (earthed) outlet that is easily accessible at all times.
- Disconnect the power from the switch by unplugging the power cord from either the electrical outlet or
the appliance.
- The AC inlet is the main power disconnect.
6. Turn on the AutoView switch and monitor, then turn on each target device. After about one
minute, the switch completes initialization and displays the OSCAR graphical user interface
Free tag on the local port monitor.
7. Depending on how you will access the switch, you can configure the network settings through
the OSCAR interface On-Screen Display (OSD) or the On-Board Web Interface (OBWI).
To configure network settings via the OSCAR interface:
1. Press Print Screen to activate the OSCAR interface Main dialog box.
2. Click Setup - Network and enter the appropriate Network Speed, Transmission Mode and
Network Configuration settings for your network.
To configure network settings via the OBWI:
1. Point your web browser to the default IP address https://192.168.1.1 to access the switch.
2. Log in to the OBWI and click the Configure tab.


